
The Ultimate Guide to the Best Chimney Caps for Rain
Protect your home from the silent destroyer: rainwater. A high-quality chimney cap is your first line of defense against costly water damage, deteriorating masonry, and dangerous mold. This comprehensive guide walks you through everything you need to know to choose, size, and install the perfect chimney cap to keep your flue dry — for good.
For most homeowners: The Forever Cap (304 stainless steel, lifetime warranty, oversized hip lid) is the best single-flue chimney cap for rain protection. It is the standard we measure every other cap against.
Multiple flues? Go with a top-mount stainless multi-flue cap like the Chimney Champion — individual caps leave the concrete crown between flues completely exposed to water damage.
High-wind coastal area? The VIVOHOME baffle-based cap uses the Venturi effect to actively pull smoke up while blocking horizontal driving rain. Keep reading for the full breakdown of every option and scenario.
1. Why a Chimney Cap for Rain Is Non-Negotiable
Think of a chimney without a cap as an open window pointing directly at the sky during a thunderstorm. You would never intentionally leave a hole in your roof, yet thousands of homeowners leave their chimney flues completely exposed to the elements. Rainwater entering your chimney is more than a minor annoyance — it is a highly destructive force that works silently over months and years before the damage becomes visible.
When wind blows across the top of an uncapped chimney, it can create a vacuum that actually pulls rain down into the flue. This is known as the chimney effect. A good chimney cap not only acts as an umbrella to keep out rain, but its sloped lid also deflects wind, prevents downdrafts, blocks animals from nesting, and serves as a spark arrestor to stop hot embers from landing on your roof.
The functions of a quality chimney cap extend well beyond rain exclusion. A cap with a properly sized mesh screen prevents birds, raccoons, and squirrels from nesting inside your flue — a problem far more common than homeowners realize, and one that can completely block draft and introduce fire hazards from accumulated nesting material. The mesh also acts as a spark arrestor: in dry weather conditions, hot embers rising from your firebox can travel through an uncapped flue and land on your roof’s shingles or in surrounding leaf litter.
2. The Anatomy of Chimney Water Damage
When rain is allowed to free-fall down your flue, the damage is insidious and expensive. Here is exactly what water destroys inside your chimney system:
- Deteriorating Masonry: Water soaks into the porous bricks and mortar of your chimney interior. During winter, this trapped water freezes and expands, causing the bricks to crack and spall (flake off). This can eventually compromise the structural integrity of the entire chimney stack. If the damage is severe, you may need to look into the cost to rebuild a chimney stack.
- Rusted Dampers: The damper is the metal plate that seals your fireplace when not in use. Constant exposure to water causes cast iron and steel dampers to rust tightly shut, requiring an expensive replacement. A rusted damper that cannot close properly also allows cold air to pour into your home continuously during winter — a significant energy waste.
- Ruined Fireboxes: Water pooling at the base of the chimney will eventually seep into the firebox, staining the refractory brick, rusting the grate, and causing a foul, musty odor. If you are struggling with this, read our guide on how to get rid of fireplace smoke smell and dampness.
- Damaged Flue Liners: Clay tile liners can crack under the stress of freezing water. Stainless steel liners, while highly durable, can suffer when water mixes with creosote to form a highly corrosive acidic solution.
- Efflorescence and Staining: White, chalky mineral deposits on your chimney’s exterior brickwork — called efflorescence — are a direct indicator of water moving through your masonry. Left unaddressed, efflorescence signals ongoing deterioration that eventually leads to structural failure.
- Interior Wall and Ceiling Damage: Water that infiltrates a chimney can travel laterally through the masonry and into the surrounding house structure — staining plaster, causing drywall to bubble and mold, and damaging wooden framing at the ceiling line. This damage is frequently misdiagnosed as a roof leak.
4. How to Choose the Perfect Cap: A Buyer’s Guide
Selecting the right chimney cap involves far more than aesthetics. The following factors determine whether your cap delivers long-term protection or becomes a rusted, ineffective piece of metal within a few seasons.
Material Matters: Stainless Steel vs. Galvanized vs. Copper
Stainless Steel (304 or 316 grade): The premium, gold-standard choice and the only material we recommend for permanent installation. Highly resistant to rust and corrosion from both weather and acidic flue gases. Most stainless steel caps come with a lifetime warranty. Grade 316 stainless — with added molybdenum — provides additional resistance to chloride attack, making it the correct specification for coastal and saltwater-adjacent properties.
Galvanized Steel: Steel coated in zinc to prevent rust. A budget-friendly option for immediate protection in mild climates, but the zinc coating degrades within 5–10 years under acidic flue gas exposure, after which the underlying steel rusts rapidly and can stain your chimney masonry with rust streaks that are difficult to remove.
Copper: Chosen primarily for architectural aesthetics on high-end historic or custom homes. Copper is extremely durable and will never rust, though it develops a natural green patina over time. It is the most expensive option and is difficult to find in standard residential sizes — most copper caps are custom fabricated.
Lid Design for Maximum Rain Deflection
The geometry of the cap’s lid is the single most important factor in its rain-blocking effectiveness. Look for:
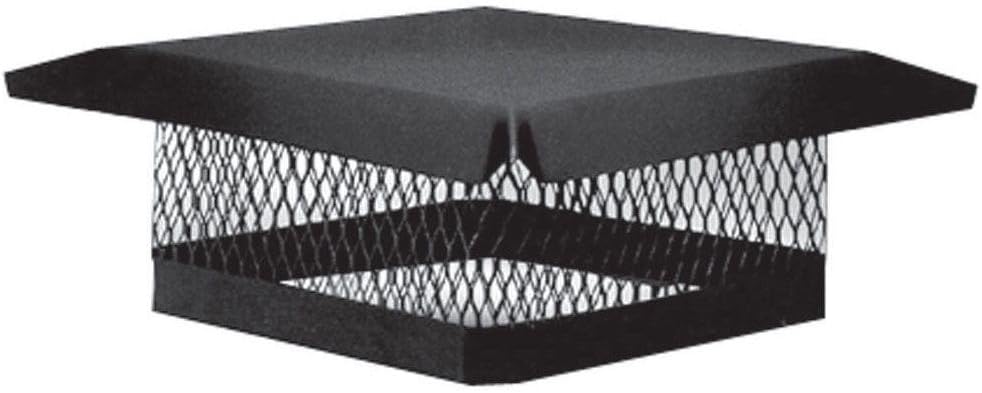
- Hip or ridge lid (pitched): A sloped lid that sheds water rapidly in all directions. Far superior to flat lids, which allow water to pond and eventually infiltrate the mesh or drip directly into the flue opening. This design is standard on quality single-flue caps.
- Generous lid overhang: The lid should extend significantly beyond the mesh screen perimeter — at minimum 2 inches on all sides. A cap where the lid barely exceeds the mesh edge will allow wind-driven rain to enter the mesh at an angle.
- Raised lid height: Caps where the lid is set higher above the flue opening allow better airflow and draft while maintaining rain exclusion.
Sizing and Measuring
A cap that doesn’t fit properly will either blow off in a storm or fail to keep water out. You must measure accurately:
- For a single square/rectangular flue: Measure the outside length and width of the clay tile protruding from the crown.
- For a single round flue: Measure the outside diameter of the metal or clay pipe.
- For multiple flues: Measure the overall length and width of the chimney crown. You will need a multi-flue, top-mount cap.
5. Material Deep-Dive: Making the Right Long-Term Choice
The material decision is the one homeowners most frequently get wrong by defaulting to the cheapest available option. Here is the full performance comparison across real-world conditions.
304 Stainless Steel
Best all-around choice. Resists corrosion from both rain and acidic flue gases indefinitely. Lifetime warranty standard. Required for any climate with regular rain, freeze-thaw, or humidity above 60%.
316 Stainless Steel
Added molybdenum provides chloride resistance essential for coastal, saltwater, and high-humidity environments. Use within 50 miles of saltwater or anywhere corrosion has been an issue.
Galvanized Steel
Zinc coating prevents rust for 5–10 years in mild climates. Acid exposure from flue gases accelerates coating failure. Will rust-stain masonry. Not recommended for coastal or wet climates.
Copper
Never rusts. Develops green patina naturally. Extremely long lifespan — well over 50 years. Expensive and mostly custom-fabricated. Ideal for historic homes or architectural showcase chimneys.
| Property | 304 Stainless | 316 Stainless | Galvanized | Copper |
|---|---|---|---|---|
| Rain Resistance | Excellent | Excellent | Good (initially) | Excellent |
| Salt Air Resistance | Good | Excellent | Poor | Excellent |
| Flue Acid Resistance | Very Good | Excellent | Poor | Excellent |
| Expected Lifespan | Lifetime | Lifetime | 5–10 years | 50+ years |
| Relative Cost | Medium-High | High | Low | Very High |
| Warranty | Lifetime (typical) | Lifetime (typical) | 4–7 years | Custom |
6. Climate & Region Cap Selection Guide
The correct chimney cap specification varies significantly by geographic region and climate. Here is a practical framework for matching cap selection to your environment.
Coastal / Salt Air
316 stainless steel required. Salt spray destroys zinc coatings and accelerates standard 304 corrosion within 3–5 years.
Cold / Heavy Snow
Stainless hip-lid cap. Conical lids shed heavy snow loads well. Galvanized deteriorates rapidly under freeze-thaw cycling.
High Wind / Exposed
VIVOHOME-style baffle cap or low-profile wind-resistant design. Standard caps allow horizontal driving rain entry under high wind.
High Annual Rainfall
304 stainless with oversized hip lid and sealant at base. Larger lid overhang critical. Galvanized will fail prematurely.
Wildfire / Dry Zone
½-inch mesh spark arrestor required by most local codes. Prioritize spark arrest rating alongside rain protection.
Mild / Low Humidity
Galvanized is acceptable for budget-conscious homeowners. Still plan to replace every 7–10 years and upgrade to stainless on the next cycle.
In climates where temperatures regularly cycle above and below freezing, the freeze-thaw mechanism is the primary driver of chimney masonry deterioration. Water that has entered your chimney masonry through a failed or absent cap expands by approximately 9% when it freezes, exerting enormous internal pressure on the brick and mortar. A single winter of uncapped exposure can accelerate masonry deterioration by years. The return on investment of a quality stainless cap — measured against masonry repair costs — is immediate and significant in freeze-thaw climates.
7. The Forever Cap: Best Overall Stainless Steel Cap

Best For: Homeowners seeking a premium, “buy-it-once” solution with a lifetime warranty and maximum rain deflection.
The Forever Cap is widely considered the industry standard for residential chimney protection. It lives up to its name thanks to its heavy-duty 24-gauge, 304-grade stainless steel construction. Unlike cheaper caps that use thin sheet metal, this cap is built like a tank — it will survive severe storms, heavy snow loads, and corrosive flue gases without ever showing a speck of rust.
The design is specifically optimized for rain protection. The large, pitched hip lid sheds water effectively in all directions and extends well beyond the mesh perimeter, preventing wind-driven rain from entering at an angle. The base flange is wide and sturdy, providing a secure grip when tightened against the flue tile, ensuring it will not blow off even in significant wind events.
The 3/4-inch mesh gauge is the optimal balance between animal exclusion and airflow — small enough to prevent entry by squirrels and birds, but large enough that normal soot accumulation does not clog the screen between cleanings. The American manufacturing provenance means quality control is consistent and replacement parts are readily available.
Pros
- True Lifetime Warranty against rust and defects
- Heavy-duty 304 stainless steel construction
- Oversized hip lid for maximum rain shedding in all directions
- Sturdy 3/4-inch animal guard mesh with optimal airflow
- Made in the USA — consistent quality control
- Wide base flange resists wind uplift
Cons
- Higher initial upfront cost than galvanized options
- Edges are sharp during DIY installation — gloves mandatory
- Square/rectangle only — round flue homeowners need a different product
8. HY-C Shelter Galvanized Steel Cap: Best Budget Option

Best For: Homeowners in mild climates or those on a strict budget who need immediate rain protection while saving toward a stainless upgrade.
If you need to cap your chimney immediately to stop an active leak but cannot afford a premium stainless steel model, the HY-C Shelter is a highly reliable choice. It is constructed from 24-gauge galvanized steel with a durable black powder coating — a dual-layer protection system that successfully resists rust for many years in moderate climates far from the coast.
The installation process is exceptionally straightforward, utilizing a pressure-fit base with heavy-duty mounting screws that bite into the exterior of the clay flue tile. While it will eventually succumb to rust — typically after 5–7 years depending on your region’s humidity and atmospheric acid levels — it provides excellent short-to-medium-term defense against rain infiltration, nesting animals, and flying embers.
Pros
- Very affordable — excellent immediate rain protection per dollar
- Black powder-coat finish is aesthetically neutral on most homes
- Simple, fast installation with all hardware included
- Effective rain exclusion and animal guard performance
Cons
- Galvanized steel will eventually rust and stain chimney masonry
- 7-year limited warranty — not a permanent solution
- Not suitable for coastal, salt-air, or very wet climates
- Acid degradation accelerated by frequent wood burning
9. Chimney Champion Multi-Flue Cap: Best for Multiple Flues

Best For: Homes with two or more flues exiting the same chimney stack, requiring protection for both the individual flue openings and the vulnerable concrete crown between them.
If your chimney has multiple flues — one for the fireplace, one for the furnace, one for the water heater — installing individual caps on each flue is a common but inadequate approach. Rain can still impact the concrete crown surface between the capped flue openings, soaking into the masonry and initiating freeze-thaw deterioration of the crown itself. Once the crown fails, water infiltrates directly into the chimney core between the liner and the outer masonry.
The Chimney Champion mounts directly to the concrete crown perimeter, acting as a full-coverage umbrella over the entire chimney top. Its removable lid design is a significant practical advantage: annual sweeping access requires only unbolting the lid, leaving the heavy base structure anchored in place rather than requiring full removal and reinstallation of a heavy component from a rooftop position.
Pros
- Protects multiple flues AND the concrete crown simultaneously
- Heavy-gauge stainless steel — lifetime warranty
- Removable lid greatly simplifies annual chimney sweep access
- Complete crown coverage prevents the most common water infiltration path
Cons
- Complex installation requiring masonry drilling and adhesive
- Significantly more expensive than single-flue caps
- Heavy — two-person installation strongly recommended
10. Master Flow Round Galvanized Cap: Best for Round Flues
Best For: Homes with standard round metal stove pipes or round clay flues, where the precision tension-clamp mounting system is essential for safe installation without pipe damage.
Many modern homes — particularly those with prefabricated fireplaces or wood-burning stoves — utilize round metal flues rather than square masonry tiles. The Master Flow Round Chimney Cap is tailored specifically for this geometry, with a classic conical lid that sheds rain and heavy snow rapidly in all directions. Its standout feature is the adjustable tension draw-band mounting system: instead of driving screws into the flue pipe (which can damage thin metal and create leak points), the base uses a clamp that distributes pressure evenly around the pipe’s circumference, securing the cap without deforming or penetrating the metal.
Pros
- Specifically engineered for round flue geometry
- Tension clamp mounting prevents pipe damage
- Affordable and widely stocked at home improvement retailers
- Conical lid sheds heavy snow loads without accumulation
Cons
- Galvanized material — shorter lifespan than stainless
- Only 4-year limited warranty
- Upgrade to stainless round cap recommended for wet or coastal climates
11. VIVOHOME Stainless Steel Wind-Resistant Cap

Best For: Homes on hills, near coastlines, or in areas prone to severe storms where driving horizontal rain and smoke downdrafts are ongoing problems with standard caps.
If you live on a hillside, near open water, or in a region with regular high-wind events, a standard cap with simple mesh sides will allow wind-driven rain to enter the flue horizontally through the screen. The VIVOHOME cap addresses this through solid stainless steel baffles that physically block lateral rain entry while simultaneously exploiting the Venturi effect: wind that strikes the baffles is accelerated around them, creating a pressure differential that actively generates an updraft inside the flue — pulling smoke out rather than pushing rain in.
The self-sizing adjustable base accommodates multiple round flue diameters, eliminating the need for exact sizing before purchase. This makes it a particularly useful solution when dealing with non-standard or in-between liner sizes.
Pros
- Baffle design actively prevents smoke downdrafts in high-wind conditions
- Blocks driving horizontal rain that defeats standard mesh caps
- High-quality stainless steel construction
- Adjustable base fits multiple round flue diameters
Cons
- Heavy and cumbersome on the roof — handle with care
- Round flues only — square flue homeowners must look elsewhere
- 1-year limited warranty is shorter than competitors
12. Direct Comparison Table
Use this table to quickly compare the key features of all five top-rated chimney caps. Swipe horizontally on mobile to view all columns.
| Product Name | Material | Best Application | Flue Shape | Lid Style | Warranty |
|---|---|---|---|---|---|
| The Forever Cap | 304 Stainless | Overall Rain Protection | Square/Rectangle | Hip (pitched) | Lifetime |
| HY-C Shelter | Galvanized + powder coat | Budget / Mild Climates | Square/Rectangle | Hip | 7-Year |
| Chimney Champion | Stainless Steel | Multi-Flue / Crown Cover | Top-Mount (Any) | Flat / Removable | Lifetime |
| Master Flow Round | Galvanized Steel | Round Metal Pipes | Round Only | Conical | 4-Year |
| VIVOHOME | Stainless Steel | High Wind / Downdrafts | Round Only | Baffled / Aerodynamic | 1-Year |
13. Full Sizing & Measuring Guide
Incorrect sizing is the most common cause of chimney cap failure — both in terms of weather performance and wind-blow-off events. Take measurements before purchasing, not after. Here is the complete sizing procedure for every flue type.
Measuring a Square or Rectangular Clay Flue Tile
- Access your chimney top safely via ladder (see Installation section).
- Measure the outside dimensions of the clay tile — the full length and width of the tile including its walls, not just the interior opening. This is the critical measurement that determines cap size.
- Note the height the tile protrudes above the chimney crown (the concrete cap). Most caps require at least 4–6 inches of exposed tile for secure mounting.
- Purchase a cap that matches or very slightly exceeds the outside tile dimensions. A cap that is 1/2 inch larger than the tile is acceptable; more than 1 inch of gap will allow the base flange to rock and not grip securely.
Measuring a Round Metal Flue Pipe
- Measure the outside diameter of the pipe at the exposed section above the crown.
- Note whether the pipe is a rigid single-wall, rigid double-wall (Class A insulated), or flexible liner — the wall thickness varies significantly between these types and affects the outside diameter at a given nominal size.
- Round caps are typically sold in nominal sizes (4″, 5″, 6″, 7″, 8″) that correspond to the inside diameter. Confirm the exact outside diameter before purchasing to ensure the clamp or base will fit.
Measuring for a Multi-Flue Top-Mount Cap
- Measure the full outside dimensions of the chimney crown — the concrete slab at the top of the chimney, not the flue tiles themselves.
- Confirm the number and position of flue openings, and ensure the cap dimensions you select will clear all flue tile tops when the cap is installed.
- Note the crown material (concrete, mortar, or manufactured crown) — some masonry adhesives are not compatible with all crown materials.
✅ Pro Sizing Tip: When In Doubt, Go Up Not Down
If your measurements fall between standard sizes, always size up rather than down. A cap that is slightly too large will still mount securely and maintain weather protection. A cap that is even slightly too small will not slide over the tile and cannot be installed at all — and you will have to return it from a rooftop purchase that has already cost you time and effort. For borderline measurements, go up one size.
14. DIY Installation Safety Guide: Single-Flue Cap
Installing a standard single-flue chimney cap is a straightforward DIY project that typically takes under 30 minutes once you are safely at the chimney top. Because it requires working at height, the preparation for safe roof access is the most important part of the job.
Sturdy extension ladder rated for your weight, a tape measure for confirming sizing at the flue tile, heavy-duty work gloves (cap edges are sharp), safety glasses, a wrench or screwdriver matching the cap’s hardware, and high-temperature exterior silicone caulk for the optional base seal. If your roof pitch exceeds 6:12, use a roof safety harness anchored to an approved anchor point.
-
Assess Roof Safety Set the ladder on firm, level ground extending at least 3 feet above the roofline. If the roof pitch is steep or the surface is damp, use a certified roof safety harness anchored to a ridge anchor. Never attempt this in rain, high winds, frost, or snow.
-
Inspect the Flue Tile and Crown on Arrival Before touching the cap, take a moment to inspect the chimney top. Look for cracked or displaced flue tiles, significant crown cracking or crumbling, and any signs of structural damage. If you see leaning, major cracks, or sections pulling away from the house, stop and call a professional — installing a cap on a structurally compromised chimney is futile. Read our guide on how to fix a chimney pulling away from the house before proceeding.
-
Clean the Flue Tile Exterior Use a wire brush to scrub the exterior of the clay tile where the cap’s base flange will make contact. Removing moss, algae, soot, and any loose material ensures the mounting screws can achieve full grip depth in clean tile material.
-
Dry-Fit the Cap Place the cap over the flue tile before tightening anything. It should slide over the outside of the tile with moderate clearance — not excessively loose, and not requiring force to slide on. If it won’t go on, you have the wrong size. If it slides on but rocks significantly, you may be one size too large.
-
Tighten the Mounting Screws Evenly Slide the cap down until it rests on the crown or stops against the tile. Tighten the provided masonry screws working in an X-pattern — front, then back, then both sides — to ensure even pressure. Do not over-tighten. Clay flue tiles are brittle and will crack if excessive torque is applied. Snug enough that the cap cannot be lifted off by hand is the correct endpoint.
-
Apply Optional Sealant for Extra Protection Run a bead of high-temperature exterior silicone caulk around the base flange where the cap contacts the flue tile. This prevents micro-leaks at the cap-to-tile interface during extreme rainfall events and extends the life of the mounting hardware by preventing water ingress to the screw holes.
15. Installing a Multi-Flue Top-Mount Cap
Top-mount multi-flue chimney caps require a different installation approach from single-flue tile-mount caps. The installation anchors to the concrete crown surface rather than to the flue tiles, and requires drilling into masonry — a significantly more involved process that the original installation guide does not cover.
-
Position and Measure the Base Frame Place the cap base frame (the metal perimeter that anchors to the crown) on the crown and confirm it clears all flue tile tops with adequate margin. Mark the anchor hole positions on the crown surface with a chalk pencil.
-
Drill the Anchor Holes Using a hammer drill with a masonry bit sized to match the supplied anchor hardware, drill to the depth specified in the cap’s installation instructions. Clear the hole of dust before inserting anchors. Masonry drilling on a rooftop requires significant care — brace yourself securely before applying pressure.
-
Apply Masonry Adhesive Under the Frame Apply a bead of heavy-duty masonry adhesive or crown sealant under the base frame perimeter before setting it into the anchor holes. This creates a waterproof seal between the frame and the crown surface, preventing water from infiltrating the anchor points.
-
Fasten the Anchors and Allow to Cure Insert and tighten all anchor fasteners. Allow the adhesive to cure fully — typically 24 hours — before installing the lid and exposing the assembly to wind load. Do not light fires in any connected appliances during the curing period.
-
Install the Lid Once the base frame is fully cured, install the removable lid per the manufacturer’s specifications. Confirm it can be easily removed by hand (or with the specified tool) for future sweep access without requiring removal of the base frame.
⛔ When to Call a Professional for Cap Installation
Hire a CSIA-certified professional if: your roof pitch is greater than 7:12 (approximately 30 degrees), your chimney crown shows significant cracking or spalling that may not support masonry anchor loads, the multi-flue cap weighs more than you can safely manage on a rooftop, or you are uncomfortable with rooftop work at any height. A professional installation costs a fraction of the expense of repairing a fall injury or a chimney damaged by an improperly anchored cap that failed in a storm.
16. Maintenance & Inspection Checklist
A chimney cap is a set-and-forget component in good conditions — but it still warrants a brief annual inspection to confirm it is doing its job. Here is what to check at your pre-season inspection.
- Confirm the cap is still securely seated — no visible lifting, tilting, or displacement from wind events
- Check all mounting screws for tightness — a single loose screw allows the cap to rock and eventually blow off
- Inspect the mesh screen for clogging — heavy soot accumulation on the mesh interior or debris accumulation on the exterior restricts draft
- For galvanized caps: look for rust spots on the mesh, lid underside, or base flange — early rust indicates the zinc coating is failing and replacement planning should begin
- For stainless caps: look for any deformation from wind events — stainless is durable but not indestructible under impact from wind-thrown debris
- Inspect the silicone sealant at the base (if applied) for cracking or separation — reapply if gaps are visible
- Check for evidence of nesting attempts — even a capped chimney can accumulate nesting material on top of the mesh that eventually adds enough weight to distort the screen
- For multi-flue caps: confirm the removable lid fasteners are secure and the base frame adhesive joint has not separated from the crown surface
- Inspect the chimney crown itself for new cracking — a deteriorating crown undermines even the best cap installation
- Confirm flashing at the base of the chimney stack is still sealed and un-lifted — flashing failure is a more common water infiltration path than cap failure in older homes
17. Beyond the Cap: Complete Chimney Waterproofing
A chimney cap is one layer of a complete chimney waterproofing system. Homeowners who install a quality cap but neglect the other waterproofing components often remain confused about why water infiltration continues even after cap installation. A chimney cap protects only the flue opening — it does not seal the masonry, the crown, or the flashing.
The Five Waterproofing Layers
- 1. The Chimney Cap: Protects the flue opening from direct rain entry and animal intrusion. This guide covers this component in full.
- 2. The Chimney Crown: The concrete cap that covers the top of the chimney structure and slopes water away from the flue tiles. A cracked or poorly constructed crown is one of the two leading causes of chimney water damage. Crown repair sealants can extend the life of a crazed or hairline-cracked crown; significant crumbling requires professional crown rebuilding.
- 3. Flashing: The waterproof metal joint between the chimney base and the roof surface. Flashing failure is extremely common in older homes and is frequently the actual source of water that homeowners blame on the chimney cap. Inspect for lifted, cracked, or corroded flashing at every annual inspection.
- 4. Masonry Waterproofing Sealant: Penetrating siloxane or silicone-based sealants applied to the exterior masonry surfaces repel water absorption into the brick and mortar. These products are vapor-permeable (allowing moisture to escape from the masonry) while preventing external water entry. Reapplication is typically needed every 5–10 years.
- 5. The Damper Seal: A fully sealing top-mount damper (installed at the chimney top) or a well-maintained throat damper prevents moist air and residual rain from infiltrating the firebox interior when the appliance is not in use.
Always repair waterproofing components in order from top to bottom. Install or confirm the cap first. Then repair the crown. Then the flashing. Then apply masonry sealant. Working out of sequence is common but counterproductive — applying masonry sealant to a chimney with a failed crown simply seals moisture that entered through the crown into the masonry, accelerating freeze-thaw deterioration rather than preventing it.
18. Frequently Asked Questions (FAQs)
Can I install a chimney cap myself?
Yes, standard single-flue chimney caps are designed for DIY installation using basic tools like a wrench or screwdriver. However, if your roof is dangerously steep, or if you need to install a heavy, top-mount multi-flue cap that requires masonry drilling, it is highly recommended to hire a professional sweep.
How often should I inspect my chimney cap?
You should inspect your chimney cap at least once a year. The best time is late summer or early fall, right before burning season. Look for signs of rust (if galvanized), ensure the mounting screws are tight, and check that the mesh screen is not clogged with leaves, soot, or creosote buildup.
Will a chimney cap negatively affect my fireplace’s draft?
No. A properly sized and installed chimney cap will not restrict your draft. In fact, by preventing wind from blowing directly down the flue (downdrafts), a good cap actually stabilizes and improves your chimney’s draft performance. Wind-resistant baffle-style caps like the VIVOHOME actually actively enhance draft performance through the Venturi effect.
What size mesh screen should a chimney cap have?
Most standard caps use a 3/4-inch or 5/8-inch mesh. This size is small enough to keep birds, squirrels, and raccoons out, but large enough that it won’t easily clog with soot and restrict airflow. In areas prone to wildfires, local building codes may require a smaller 1/2-inch mesh to act as a strict spark arrestor. Check your local codes before purchasing if wildfire is a relevant concern in your region.
Why is my galvanized chimney cap rusting?
Galvanized steel is coated in zinc to prevent rust. However, the acidic nature of fireplace exhaust gases — combined with rain — slowly dissolves this zinc coating. Once the raw steel beneath is exposed to moisture and oxygen, it rusts rapidly and can stain your chimney masonry with brown streaks that are difficult to clean. This is why stainless steel is a vastly superior long-term investment for any homeowner who burns regularly.
Does a chimney cap prevent carbon monoxide problems?
Indirectly, yes — and it is an important connection to understand. A chimney cap prevents rain from entering the flue. Rain that enters an uncapped flue mixes with creosote to form an acidic solution that corrodes clay tile liners and stainless steel liners over time, creating cracks and gaps through which combustion gases — including carbon monoxide — can escape into wall cavities and living spaces. Maintaining a properly capped chimney extends liner life and reduces the risk of CO-related liner breaches. However, a cap is not a substitute for a functioning CO detector and annual liner inspection.
My chimney already leaks. Will installing a cap fix it?
Possibly, but not necessarily. If the leak is caused by rain entering directly through the uncapped flue opening, a cap will fix it immediately. If the leak is caused by a cracked chimney crown, failed flashing, deteriorated mortar joints, or damaged masonry, the cap alone will not solve the problem — those infiltration pathways are independent of the flue opening and require their own repairs. An active chimney leak should always be diagnosed by a certified sweep with a camera before purchasing any materials, to confirm that the flue opening is the actual infiltration point.
Can I use a stainless chimney cap on a gas appliance?
Yes, and for gas appliances specifically, stainless is the recommended minimum — and 316 stainless is preferred where available. Gas appliances produce condensing flue gases that are more acidic and corrosive than wood-burning exhaust. Galvanized caps fail significantly faster on gas appliances than on wood-burning chimneys, often within 3–5 years rather than 7–10, because the sulfuric compounds in gas condensate are particularly aggressive against zinc coatings.
19. Conclusion and Final Recommendation
A high-quality chimney cap is not an optional accessory — it is a critical component of your home’s roofing and heating system. Allowing rain to freely enter your flue guarantees expensive masonry repairs, rusted dampers, liner corrosion, and dangerous mold growth in the surrounding wall structure.
While galvanized options like the HY-C Shelter offer excellent short-term budget relief, we strongly advise investing in stainless steel if you plan to remain in your home long-term. The Forever Cap stands out as our definitive recommendation for single-square-flue homes: its heavy-duty construction, oversized rain-deflecting hip lid, and lifetime warranty make it a buy-it-once product that delivers unbeatable long-term value against rain damage.
For multi-flue chimneys, the Chimney Champion’s top-mount crown-covering design is the only approach that protects the entire chimney top — not just the individual flue openings. And for homeowners dealing with persistent downdraft and horizontal driving rain, the VIVOHOME baffle cap’s Venturi-effect engineering solves the problem that standard caps cannot address.
Ready to Stop the Leaks?
Don’t wait for the next heavy rainstorm to cause thousands in water damage. Browse the top-rated, rain-deflecting chimney caps today and protect your home’s most vulnerable opening.
Shop Top-Rated Chimney Caps on Amazon