
How to Put Out a Chimney Fire: The Ultimate Emergency & Safety Guide
If you hear a roaring sound like a freight train, see dense black smoke, or flames shooting from the top of your chimney:
1. Evacuate your family immediately.
2. Call 911 from outside.
3. Do not assume the fire will burn itself out.
A chimney fire is one of the most terrifying events a homeowner can experience. It transforms your source of winter comfort into a potential structural disaster in a matter of minutes. The intense heat — which can exceed 2,000°F inside the flue — can crack clay liners, melt mortar, warp steel dampers, and ignite the wood framing of your home before the fire department arrives.
In this comprehensive guide, we detail exactly how to put out a chimney fire if you catch it early, how to recognize the signs, the science behind why these fires start, what happens structurally during the event, post-fire recovery steps, insurance considerations, and the complete prevention protocol to ensure it never happens again. We also explore the physics of airflow, referenced in our guide on fireplace draft problems.
📖 Table of Contents (Click to Expand)
- 1. Is It Actually a Chimney Fire?
- 2. Types of Chimney Fires: Silent vs. Free-Burning
- 3. 5 Steps to Extinguish a Chimney Fire
- 4. Fatal Mistakes: What NOT To Do
- 5. What Happens Structurally During a Chimney Fire
- 6. What to Tell the Fire Department
- 7. Essential Safety Gear for Your Hearth
- 8. The Aftermath: Recovery & Inspection
- 9. Insurance Claims After a Chimney Fire
- 10. Understanding Creosote: The Root Cause
- 11. Chimney Fires in Wood Stoves vs. Open Fireplaces
- 12. Warning Signs Your Chimney Is at High Risk
- 13. Complete Prevention Protocol
- 14. Family Fire Escape Plan for Chimney Events
- 15. When to Call a Certified Chimney Sweep
- 16. Frequently Asked Questions
👁 Is It Actually a Chimney Fire?
Before taking drastic action, confirm that what you are experiencing is actually a chimney fire and not a related but less serious issue. Panic leads to dangerous decisions — a methodical 10-second assessment can save your life and your home. For a deeper dive into the full range of symptoms, read our detailed article on chimney fire signs.
Confirmed Chimney Fire Signs
- Roaring or rushing sound from the firebox or chimney — often described as a low-flying jet or express train
- Loud popping or cracking — the sound of a clay tile liner fracturing under thermal shock
- Dense, dark brown or black smoke pouring from the fireplace into the room, distinct from normal wood smoke
- Intense radiant heat from the mantel, walls, or ceiling around the chimney
- Visible flames or sparks at the top of the chimney stack (seen from outside)
- Sharp, acrid smell unlike normal wood smoke — burning tar or asphalt-like odor
It Is Probably NOT a Chimney Fire If…
- You hear scratching or chirping — this may be a bird or animal. See our guide on birds stuck in chimneys or raccoons in chimneys
- You smell smoke but see no visual signs — this may be a draft problem. Read our draft diagnosis guide
- Smoke is entering the room without excessive heat — see fireplace smoke coming into the house
- You hear a gentle hissing — this may be moisture in the firewood vaporizing normally
🔥 Types of Chimney Fires: Silent vs. Free-Burning
Most homeowners only know about dramatic, explosive chimney fires — the ones that announce themselves loudly. But there is a second, far more insidious type that does enormous damage completely without the homeowner’s knowledge.
Burns intensely with a roaring sound. Temperatures exceed 2,000°F. Flames may be visible from the chimney top. Obvious and terrifying — but because it announces itself, homeowners typically respond by calling 911. This type causes severe, immediate structural damage to the flue liner, mortar, and potentially roof shingles from escaping sparks.
Burns without dramatic signs — no roaring, no visible flames. Temperatures are lower but sustained. A silent chimney fire may occur multiple times over a season without the homeowner ever knowing. Each event progressively damages the flue liner, weakening the chimney’s ability to contain future fires. Often only discovered during a professional inspection months later — after significant structural damage has occurred.
A free-burning chimney fire is terrifying, but because it triggers an emergency response, it gets addressed immediately. A silent chimney fire goes undetected — damage accumulates over an entire season, and the homeowner continues using a structurally compromised chimney. The next free-burning fire then has a clear path directly into the home’s framing through cracked liner sections. This is why annual professional inspections are not optional — they are the only reliable way to catch silent fire damage.
What Makes Creosote Ignite
The fuel for both types of chimney fire is creosote — a complex mixture of organic combustion byproducts that condenses on the interior of the flue when smoke cools too rapidly. Creosote progresses through three degrees of severity:
- First degree (flaky, sooty deposits): Lowest ignition risk. Removed by standard annual brush sweeping.
- Second degree (shiny, tar-like coating): Moderate ignition risk. Requires professional rotary cleaning tools or chemical treatments.
- Third degree (glazed, rock-hard or dripping tar): Extremely high ignition risk. Burns at the highest temperatures and is the primary fuel for catastrophic free-burning fires. Chemical treatment and mechanical removal are both difficult and expensive. In severe cases, the flue liner must be replaced entirely.
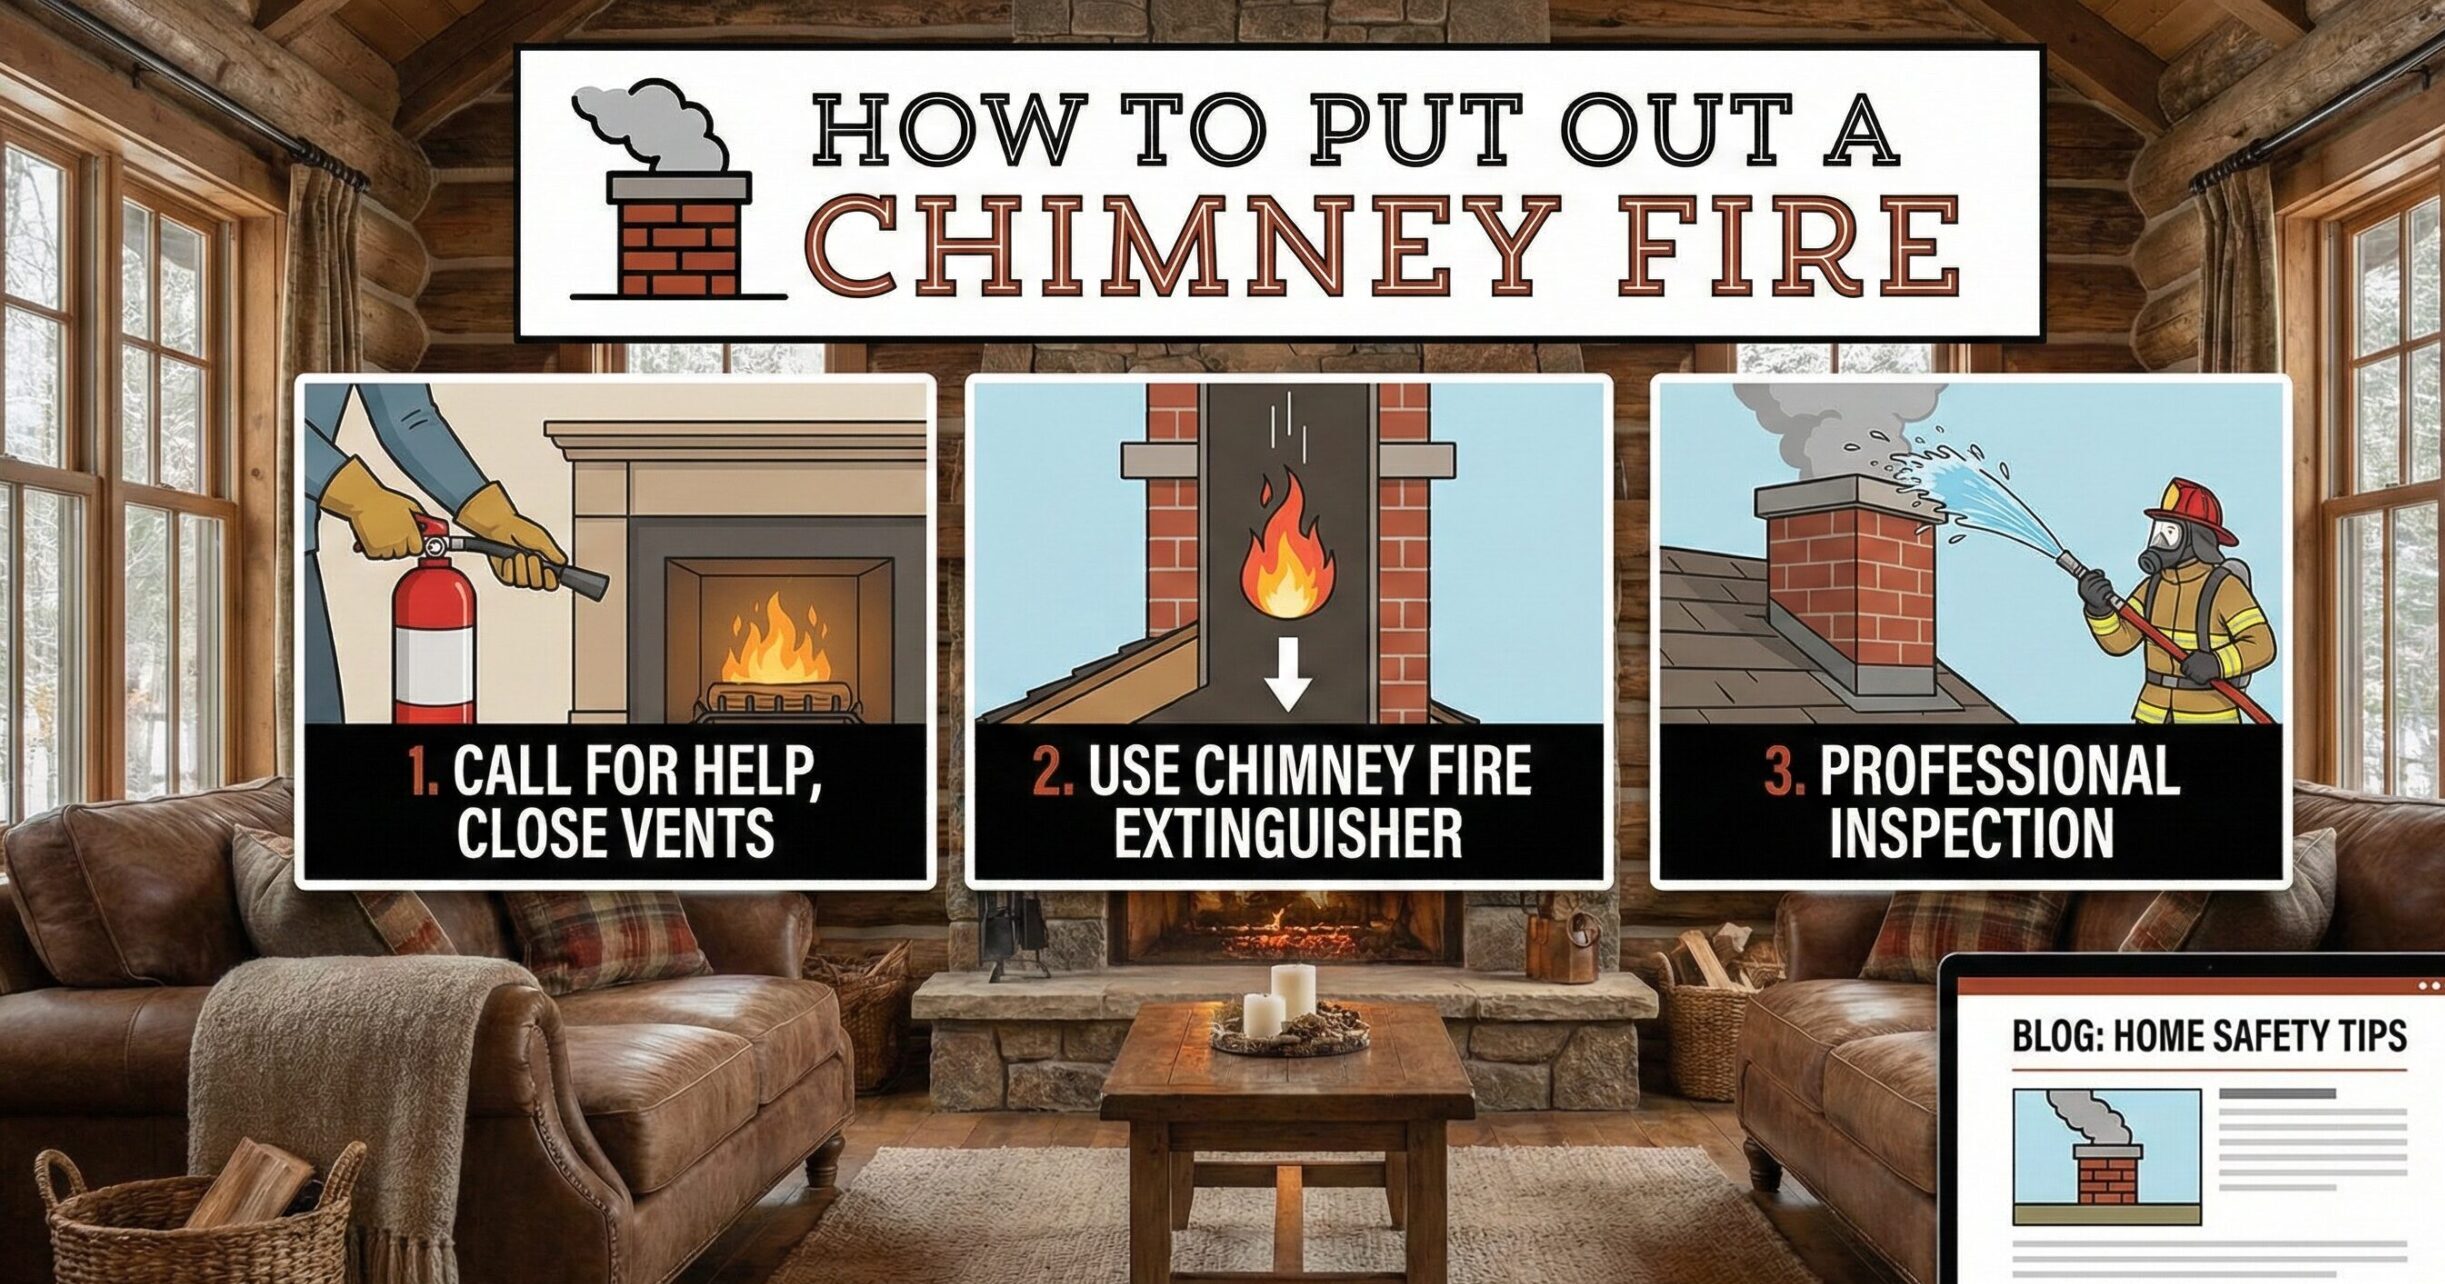
⏱ 5 Steps to Extinguish a Chimney Fire
If you have confirmed a chimney fire and it is safe to briefly approach the fireplace before evacuating, follow these steps. These actions can save your home — but they are only appropriate if you are not yet in immediate danger. When in doubt, get out first.
Cut the Oxygen Supply
Fire requires oxygen to burn. Immediately close the glass doors on your fireplace. If you have a wood stove or insert, shut the air intake vents completely. If you have an open-faced fireplace with no doors, this step is limited — which is one reason fireplace inserts are significantly safer in a fire event.
Close the Damper (If Accessible)
If the damper handle is accessible and not dangerously hot, close the damper. This reduces the draft that feeds the chimney fire with fresh air from outside. Use heavy welding gloves — the metal handle will be hot. Do not attempt this if the firebox is engulfed or if smoke is filling the room.
Deploy a Chimney Extinguisher (Chimfex)
If you have a specialized chimney fire suppressant device (Chimfex is the most common), ignite it per the instructions and place it in the firebox — next to the fire, not directly in the flames. Then close the firebox doors immediately. The device releases gases that displace oxygen in the flue, suppressing the fire. It does not put the fire out completely but buys critical time for evacuation.
Steam the Firebox (Limited Tactic)
If you have no extinguisher device, you can throw a small amount of water directly onto the burning logs in the firebox — not onto the masonry, not into the chimney. The steam this creates rises into the flue and temporarily reduces oxygen availability. This is a limited tactic and should not delay your evacuation. Never pour large quantities of water.
Evacuate & Hose the Roof
Get everyone out of the house. If you can safely use a garden hose from the ground — not from the roof — spray the roof area around the chimney base to prevent sparks from igniting roofing materials. Do NOT spray water down the chimney from above. Call 911 immediately from outside.
❌ Fatal Mistakes: What NOT To Do
During a chimney fire, well-meaning but incorrect responses can turn a manageable emergency into a catastrophic one. These are the most common and most dangerous mistakes homeowners make.
This is the single most dangerous thing you can do during a chimney fire. Pouring water from above into a chimney burning at 1,500–2,000°F causes instant thermal shock to the masonry. Clay tiles crack and can explode. Steam builds up explosively, potentially blowing out chimney walls and sending burning debris into the attic. The chimney could collapse. If you need to apply water, apply it only to the burning logs in the firebox or to the roof shingles around the chimney base from the ground.
During an active chimney fire, the roof structure may be compromised. Escaping embers can ignite dry shingles anywhere on the roof. The chimney itself may be structurally unstable. Never go onto the roof during or immediately after a chimney fire event.
Some homeowners assume a chimney fire will extinguish itself when it runs out of fuel. While technically possible, the structural damage occurring during this “wait” period is immense. More critically, unseen fire spread to attic framing is possible at any moment. Never wait out a chimney fire.
A common instinct during any fire event is to open windows for fresh air. During a chimney fire, this is counterproductive — it increases the draft, feeding the fire with more oxygen and intensifying the burn. Keep interior doors between the fireplace room and the rest of the house closed to slow fire spread.
After any chimney fire — even a small one that appears to have gone out on its own — the fireplace must not be used again until a certified Level 2 inspection confirms the flue is structurally intact. A compromised liner can vent combustion gases directly into your home, causing carbon monoxide poisoning.
For structural safety concerns, including damage to mortar joints that can result from thermal shock, see our guide on best mortar for chimney repair.
🏠 What Happens Structurally During a Chimney Fire
Understanding the structural sequence of events during a chimney fire helps homeowners appreciate the urgency of both the emergency response and the post-fire inspection process. The damage progresses through several stages simultaneously.
Stage 1: Liner Damage (0–5 Minutes)
The flue liner — whether clay tile, cast-in-place, or stainless steel — is the primary containment barrier between the intense heat in the flue and the surrounding masonry and home structure. Clay tile liners, the most common type in older homes, are rated to withstand the temperatures of normal wood fires (typically 500–900°F). They are not rated to withstand chimney fire temperatures of 1,500–2,000°F.
Within the first few minutes of a free-burning chimney fire, clay tile liners begin experiencing thermal shock — rapid, uneven expansion that causes cracking. Hairline cracks develop first, then larger fractures. In severe cases, entire sections of liner can collapse, creating open pathways for flames and gases to reach the surrounding masonry and framing.
Stage 2: Mortar Joint Failure (5–15 Minutes)
The mortar that holds together the masonry surrounding the flue liner begins to deteriorate rapidly as heat transfers through the cracked liner. As the mortar softens, gaps appear between bricks and stone. These gaps allow hot gases to migrate outward. Once hot combustion gases reach the surrounding chase framing, a structural fire can ignite in the home’s concealed spaces — completely invisible from inside the living area.
Stage 3: Roof and Attic Risk (5–20 Minutes)
Sparks and burning debris ejected from the chimney top can travel considerable distances in wind and land on dry roofing materials, accumulated leaf debris in gutters, or dry vegetation nearby. A fire that is limited to the chimney can become a full roof or structural fire from this secondary ignition pathway, entirely independently of what is happening inside the chimney itself. This is why the fire department, even if they arrive to find the chimney fire apparently contained, will typically check the attic and roof space before leaving.
A properly fitted chimney cap with a spark arrestor mesh screen is one of the most effective defenses against secondary fire spread during a chimney event. The mesh prevents large burning debris from exiting the chimney top. We reviewed the best chimney caps for rain and fire protection — look for models with 5/8″ stainless steel mesh specifically designed for spark arrestor duty.
📞 What to Tell the Fire Department
When you call 911 for a chimney fire, the dispatcher and responding crew need specific information to respond effectively. A clear, calm call with the right information can mean the difference between a contained chimney event and a whole-house fire.
- State the emergency type clearly. “I have an active chimney fire at [address].” This tells dispatch to send a full response rather than a single unit.
- Confirm whether anyone is still inside. Tell the dispatcher if you are calling from outside and whether all occupants are accounted for, including pets.
- Describe the visible signs. “I can see flames from the chimney top” or “Dense black smoke is entering the living room.” This helps the crew prepare the correct equipment during the response.
- Tell them if you used a Chimfex or similar device. Fire crews need to know what suppressant agents have been deployed in the firebox so they do not inadvertently create a hazardous gas buildup when they open the fireplace.
- Describe the home structure. Two-story, wood frame, chimney on the north exterior wall — these details help the crew assess access routes and attic risk quickly.
- Stay on the line. Do not hang up until the dispatcher releases you. Move to your designated meeting point away from the structure.
When the fire crew arrives, direct them to the fireplace location if it is safe to re-enter briefly with them, and show them the cleanout door location if your chimney has one at the base.
🛡 Essential Safety Gear for Your Hearth
Every home with a wood-burning appliance should keep these items within immediate reach of the fireplace. The gap between having these tools and not having them is measured in the minutes it takes for a chimney fire to spread.
Chimfex Original Chimney Fire Extinguisher
The gold standard for homeowner chimney fire response. Chimfex releases gases that displace oxygen in the flue, suppressing the fire without the thermal shock risks of water. Rated for use in fireplaces, wood stoves, and pellet stoves. Each unit handles a single event — keep two in your safety kit. Store within arm’s reach of the fireplace, not in a distant storage closet.
Check Price on AmazonKidde Fire Extinguisher (Class A-B-C)
While Chimfex handles the flue itself, you need a standard multi-class extinguisher for any burning logs that roll out of the firebox, sparks that reach carpets or furniture, or secondary ignition on the hearth surround. A 5-lb ABC extinguisher is the minimum recommended size. Mount it visibly on the wall near the fireplace — not hidden in a cabinet.
Check Price on AmazonHeavy Duty Welding Gloves
Standard oven mitts and kitchen gloves do not provide adequate thermal protection when handling a hot damper handle, fireplace door latch, or firebox during or immediately after a fire event. Welding gloves provide protection to 500°F+ and give the dexterity needed to operate mechanical components quickly. Keep a pair hanging on the fireplace tool set.
Check Price on AmazonAdditional Safety Equipment to Install Now
- Carbon Monoxide Detector: Placed within 15 feet of the fireplace. CO poisoning from a compromised flue is a leading chimney-related fatality. Test monthly; replace batteries annually.
- Smoke Detector: Ensure the living area smoke detector is functional and recently tested. Interconnected detectors (whole-house alarm) are significantly safer than single-room units.
- Fireplace Screen: Prevents sparks from reaching flooring and furniture during normal use. A tight-fitting metal mesh screen is more effective than a freestanding glass screen for spark containment.
- Fireplace Hearth Rug: A fire-resistant hearth rug extends your protected zone beyond the metal hearth plate and catches sparks and ash.
- Phone Charging Station Near Exit: During an emergency, people stop to find their phones. A designated near-exit charging location ensures phones are accessible without delay during evacuation.
🔧 The Aftermath: Recovery & Inspection
Once the fire is out and the fire department has cleared the scene, the recovery process begins. This phase is just as critical as the emergency response — returning to use a fire-damaged chimney without proper inspection and repair is one of the most common causes of repeat chimney fires and CO poisoning incidents.
1. Do Not Use the Fireplace
This seems obvious, but many homeowners — particularly after a silent chimney fire or a quickly-suppressed event — resume fireplace use without inspection, believing the damage must be minor. This is a serious error. Even hairline cracks in the flue liner are sufficient pathways for CO and flames to enter the home structure. The fireplace must be treated as completely out of service until a certified Level 2 inspection clears it.
2. Mandatory Level 2 Inspection
A Level 2 chimney inspection involves passing a video camera through the full length of the flue to assess the interior condition of the liner, mortar, and connections. This is the minimum standard recommended by the National Fire Protection Association (NFPA 211) following any chimney fire event, regardless of apparent severity. A Level 2 inspection costs between $200 and $500 depending on your location and chimney complexity — a small fraction of the cost of ignoring the damage.
The inspector will specifically look for: cracked or displaced flue tiles, mortar joint failures, heat-damaged smoke chamber components, warped steel dampers, compromised crown or cap, and any sign of fire spread beyond the chimney enclosure into the framing.
3. Soot and Smoke Damage Remediation
Even a contained chimney fire produces significant soot and smoke infiltration into the living space. Soot particles are extremely fine and settle on every surface — walls, furniture, HVAC filters, and soft furnishings. Soot is also mildly acidic and will cause corrosion and discoloration if not removed promptly. For serious soot infiltration, professional remediation services are typically required. At minimum, replace all HVAC air filters immediately and clean all hard surfaces with a soot-specific cleaning compound.
4. Structural Repair Priorities
Based on the Level 2 inspection findings, your certified chimney professional will prioritize repairs. Common post-fire repairs include:
- Flue liner replacement or relining: Stainless steel inserts or cast-in-place liners are the modern standard for fire-damaged flues. Read about future maintenance with the best chimney brush for stainless steel liners.
- Mortar joint repointing: Failed mortar joints must be raked out and repointed with appropriate refractory mortar. Standard Portland cement mortar is not appropriate for chimney applications. See our guide on the best mortar for chimney repair.
- Chimney crown repair or replacement: The crown — the concrete cap that seals the top of the masonry around the flue liner — often cracks from thermal shock. A damaged crown allows water infiltration that dramatically accelerates freeze-thaw deterioration.
- Flashing inspection and resealing: Heat from a chimney fire can warp or debond the flashing that seals the chimney-roof junction. Apply appropriate chimney flashing sealant or have the flashing fully replaced if it shows signs of lifting.
- Exterior waterproofing: After masonry repairs, apply a penetrating masonry waterproofer to prevent future moisture infiltration. Learn how to waterproof a chimney properly.
📄 Insurance Claims After a Chimney Fire
A chimney fire is a significant financial event. The good news is that most standard homeowners insurance policies do cover chimney fire damage — but the claim process has nuances that many homeowners do not understand until they are already in a dispute with their insurer. We have a dedicated guide answering: does homeowners insurance cover chimney repair?
What Is Typically Covered
Most standard homeowners policies cover “sudden and accidental” damage from fire events. This includes: structural damage to the chimney caused by the fire itself (cracked liner, failed mortar, collapsed sections), damage to the home’s structure if the fire spread beyond the chimney (attic framing, roof sheathing), remediation of smoke and soot damage to interior surfaces and contents, and in some policies, temporary housing costs if the home is rendered uninhabitable.
What Is Commonly Contested
Insurance companies may contest claims for chimney fire damage when there is evidence that the damage resulted from deferred maintenance rather than a sudden accident. If your insurer’s adjuster finds evidence of extreme creosote buildup, evidence of prior damage that was never repaired, or lack of any inspection history, the company may argue that the homeowner’s negligence — not an “accident” — caused the loss. This is a meaningful distinction that can result in partial denial of your claim.
Keep records of every chimney inspection, cleaning, and repair — receipts, inspection reports, before-and-after photos. This documentation directly supports a claim narrative that you maintained the appliance responsibly, making the fire a genuine accident rather than a foreseeable outcome of neglect. Store digital copies in cloud storage, not only on a home computer that could be damaged in the same fire.
Steps to Take Before the Adjuster Arrives
- Photograph everything — the firebox, visible damage to the chimney interior and exterior, roof, attic, and all affected surfaces — before any cleanup begins.
- Do not make permanent repairs until after the adjuster visit. Temporary protective measures (tarping a damaged roof section, for example) are appropriate, but permanent repairs made before the adjuster documents damage can reduce your settlement.
- Get a written inspection report from a certified chimney professional before or immediately after the adjuster visit. This professional assessment of damage extent carries significant weight in the claims process.
- Document all related costs including emergency services, hotel stays, storage, cleaning materials, and professional assessments from the date of the event.
- Review your policy’s exclusions carefully, particularly language around “neglect,” “lack of maintenance,” and “faulty installation.” If you believe a denial is unjust, you have the right to dispute the decision through your state’s insurance commissioner.
🧪 Understanding Creosote: The Root Cause
Every chimney fire investigation traces back to the same culprit: creosote. Understanding how creosote forms, what conditions accelerate its accumulation, and how it transitions from a nuisance to a catastrophic fuel is fundamental to prevention.
The Chemistry of Creosote Formation
When wood burns, it produces a complex mixture of combustion gases, water vapor, unburned carbon particles (soot), and volatile organic compounds (VOCs). In a hot, well-drafted fire with dry, seasoned wood, the vast majority of these compounds combust fully and exit the flue as relatively clean gases.
When the fire is cooler, slower, or the wood contains higher moisture, combustion is incomplete. The unburned compounds — particularly polycyclic aromatic hydrocarbons (PAHs), benzene derivatives, and tar-like compounds — rise as vapor with the smoke. When this vapor-laden smoke contacts the relatively cooler interior surfaces of the flue liner (typically 200–400°F in normal operation), these compounds condense back into liquid and solid form, adhering to the liner surface.
Over time, layer by layer, these deposits build up — drying, hardening, and becoming progressively denser and more concentrated in combustible compounds. When this accumulated material reaches its ignition temperature (which varies by degree but begins around 450°F for first-degree deposits and can be higher for glazed third-degree creosote that is more chemically stable), it ignites.
Factors That Accelerate Creosote Buildup
| Factor | Effect on Creosote | Risk Level |
|---|---|---|
| Burning wet/green wood (>25% moisture) | Greatly increases unburned compounds in smoke | Very High |
| Burning softwood (pine, fir) as primary fuel | High resin content produces sticky creosote | High |
| Slow, smoldering fires with restricted airflow | Incomplete combustion, lower flue temperatures | High |
| Oversized flue for the appliance | Gases travel slowly, more condensation time | Moderate |
| Cold exterior temperatures with short fires | Flue never reaches operating temperature | Moderate |
| Burning seasoned hardwood with full damper | Hotter, cleaner combustion | Low |
| Annual professional cleaning and inspection | Deposits removed before they reach dangerous levels | Very Low |
⚒ Chimney Fires in Wood Stoves vs. Open Fireplaces
Chimney fires can occur in any solid fuel burning system, but the dynamics differ significantly between open fireplaces and enclosed wood stoves or inserts. Understanding these differences shapes both the emergency response and the prevention strategy.
Open Fireplaces
- Lower combustion efficiency means more unburned compounds enter the flue
- Cannot be completely sealed during a fire event — oxygen cutoff is incomplete
- Larger, faster-cooling flue typically runs at lower average temperatures
- Creosote often deposits in a broader zone down the flue length
- During a fire, a fireplace screen provides minimal oxygen restriction
- More difficult to deploy suppressant devices effectively
Wood Stoves & Inserts
- Much higher combustion efficiency reduces unburned compound production
- Air vents can be fully closed during a fire event for effective oxygen cutoff
- Chimfex and similar devices are highly effective when deployed into the sealed firebox
- EPA-certified modern stoves produce significantly less creosote per BTU
- Stove pipe connections are a common point of failure — inspect annually
- Overloading a stove or using it beyond rated capacity increases fire risk
From a chimney fire response perspective, a wood stove or insert actually gives the homeowner more control during the first few minutes of an event — the ability to completely seal the firebox and cut off oxygen is a significant tactical advantage over an open fireplace. However, this advantage only exists if the homeowner is present and acts quickly. An unattended stove fire that has spread beyond the firebox before discovery provides no advantage at all.
🚨 Warning Signs Your Chimney Is at High Risk
A chimney fire rarely occurs without warning. In retrospect, most homeowners can identify signs they dismissed or did not recognize. These are the pre-fire indicators that should trigger an immediate professional inspection:
A lingering smoky odor in the home when the fireplace has not been used for hours or days — especially noticeable on humid days — indicates creosote deposits are off-gassing into the living space. This is a reliable indicator of significant third-degree buildup.
Oily, tar-like streaks dripping down from the damper area or visible on the smoke shelf are signs of second or third-degree creosote above. When you see dripping creosote, the flue above is heavily coated and must be addressed professionally before any further burning.
If fire starting requires more effort than previously, if smoke hangs longer in the firebox before exiting, or if the fire seems starved for air with the damper fully open, the flue may be partially obstructed by creosote deposits or structural collapse. See our draft problems guide.
Staining on exterior masonry above the crown line, missing mortar, loose bricks, a displaced or damaged cap, or rust streaks from the flue liner are all signs of a chimney that needs professional attention before burning season begins.
If you cannot confirm that your chimney was swept and inspected within the last 12 months — especially if you burned heavily, burned softwood, or burned any questionable fuel — assume a significant buildup exists. This is not paranoia; it is the NFPA standard recommendation for any wood-burning system.
Occasional popping from wet firewood is normal. Repeated, sharp metallic or concrete-sounding pops from within the chimney structure during a fire can indicate existing cracks in the liner expanding under heat — a sign of previous thermal damage that has not been repaired.
✅ Complete Prevention Protocol
The only guaranteed cure for a chimney fire is preventing one from ever occurring. Every element of this prevention protocol addresses one or more of the known causes. Implement all of them — skipping even one creates a meaningful vulnerability.
Fuel Management
- Burn only dry, seasoned hardwood with a moisture content below 20%. See our guide on the best firewood for fireplace use, which ranks species by BTU output, creosote production, and ease of seasoning.
- Test firewood moisture with a digital meter before buying or burning large quantities.
- Never burn green wood, softwood as a primary fuel, treated lumber, painted wood, cardboard, trash, or any non-wood material.
- Season new wood for a minimum of 12 months (18–24 months for dense species like oak and hickory) before use.
Burning Technique
- Always warm the flue before loading a full fire. Light a small kindling fire with the damper fully open for 10–15 minutes to establish a strong upward draft and pre-heat the liner.
- Keep the damper fully open during the active burning phase. Only begin to reduce the damper after the fire has transitioned to a full, hot burn with established draft.
- Avoid slow, smoldering overnight fires. A fire that is sustained at the lowest possible burn rate produces vastly more creosote per BTU than a shorter, hotter fire.
- Use proper chimney fire starters — not liquid accelerants — to establish clean, hot ignition from the beginning of every fire.
Maintenance Schedule
- Annual Level 1 inspection and sweep by a certified chimney sweep (CSIA-certified) before each burning season. If you burn heavily (more than three fires per week), schedule mid-season as well.
- Annual cap and crown inspection. The cap keeps out animals, birds, rain, and debris — all of which can obstruct the flue and create dangerous conditions. The best chimney caps also provide spark arrestor protection.
- Check damper operation at the start of each season. A stiff, partially-stuck damper that cannot fully open or close correctly is both a draft problem and a fire hazard.
- Inspect and clean the smoke shelf at least annually. The smoke shelf above the firebox opening collects fallen debris, bird nests, and creosote. This accumulated material can ignite from radiant heat during normal fires.
Equipment and Monitoring
- Install a working carbon monoxide detector within 15 feet of the fireplace and test it monthly.
- Keep a Chimfex extinguisher and standard fire extinguisher within reach of the fireplace at all times during burning season. Replace Chimfex units if their storage conditions have been compromised (extreme heat or cold).
- Ensure your home has working interconnected smoke detectors on every level, including the attic.
- Have your chimney inspected for leaks annually — water infiltration accelerates liner deterioration and creates the conditions for structural failure during a fire event.
🏠 Family Fire Escape Plan for Chimney Events
Having a specific fire escape plan that accounts for a chimney fire event — which typically originates in a central location of the home and can involve rapid smoke spread — is a critical but often neglected element of home fire safety.
Design Your Escape Plan
- Map two exit routes from every room. The primary route from the fireplace room (typically the living room) must bypass the chimney wall. The secondary route — typically through a window — must be accessible without tools.
- Designate an outdoor meeting point. Choose a specific, clearly visible location away from the structure — a mailbox, neighbor’s driveway, or street corner. Everyone must know the exact location. Do not make “outside” the meeting point — it is not specific enough in a panicked situation.
- Assign roles for family members. Who is responsible for young children or elderly relatives who may need assistance? Who calls 911? Who checks that everyone has exited? These decisions made in advance save critical seconds during an actual event.
- Practice the escape plan twice annually. A plan that has never been physically practiced will not be executed reliably under stress. Do one daytime walk-through and one nighttime drill.
- Establish a “no return” rule. No one re-enters the building for possessions, pets, or any other reason once evacuation has begun. Firefighters will retrieve pets if it is safe to do so. This rule must be practiced until it is instinctive.
- Teach children not to hide. Children’s instinct during fire events is often to hide — under beds, in closets. Teach and practice that evacuation is always the response to fire alarms or adult direction, never hiding.
For homes with wood-burning fireplaces, carbon monoxide detectors should be placed near sleeping areas as well as near the fireplace. CO is heavier than air in dense concentrations but tends to mix throughout the room in normal leakage scenarios — placing detectors at breathing height (approximately 5 feet from the floor) near sleeping areas provides the earliest warning for nighttime incidents.
👨🔧 When to Call a Certified Chimney Sweep
The DIY chimney maintenance market has grown considerably — brush sets, inspection cameras, and cleaning kits are all widely available. For light, first-degree creosote removal, competent homeowners can manage annual sweeping themselves. But there are specific situations where a Chimney Safety Institute of America (CSIA)-certified professional sweep is absolutely necessary:
- Any time following a chimney fire event, regardless of apparent severity
- When second or third-degree creosote deposits are suspected or visible
- Before burning in a home you have recently moved into with no inspection history
- When the chimney has been unused for more than one full season
- When a draft problem develops that cannot be diagnosed through basic inspection
- When visible damage to the exterior masonry, cap, crown, or flashing is observed
- When unusual sounds or odors are present that were not there in prior seasons
- When you are installing a new wood stove, insert, or liner
A CSIA-certified sweep has passed standardized knowledge examinations and maintains continuing education requirements. NFPA certification (through the National Fireplace Institute) is an additional credential worth looking for. When evaluating sweep companies, ask specifically whether they carry general liability insurance and whether their inspections adhere to NFPA 211 standards. Access our curated guide to the best chimney services to find vetted providers in your area.
DIY Chimney Maintenance: What Is Reasonable
Between professional visits, homeowners can perform meaningful maintenance that reduces risk and extends the life of the chimney system:
- Monthly visual inspection of the firebox, smoke shelf, and visible damper assembly during burning season
- Cap inspection from the ground using binoculars after major storms
- Removing light, first-degree soot deposits with a chimney sweep vacuum system and appropriate brush
- Checking and replacing carbon monoxide detector batteries
- Ensuring the damper opens fully and seals completely when closed
- Checking the hearth extension for cracks that could allow fire to reach flooring
For additional expert reading on post-event maintenance, we recommend consulting Brick and Ember’s Life-Saving Tips on this topic. Also bookmark our comprehensive winter home safety resource covering related concerns beyond the chimney: winter home and car comfort tips.