Water is the universal solvent, and nowhere is this more evident than on your roof. Among all the potential entry points for water in a home, the chimney is the most notorious offender. It is a large, heavy structure penetrating your roof, creating seams and angles that are difficult to seal perfectly.
The metal barrier designed to protect this vulnerable intersection is called flashing. When flashing fails, water doesn’t just drip; it pours into your attic, rots your roof deck, and ruins your drywall. The problem is, identifying a flashing leak is rarely straightforward. Is it the bricks? The cap? Or that thin strip of metal?
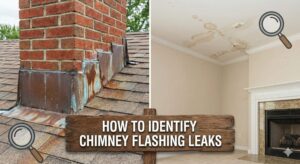
In this comprehensive guide, we will walk you through exactly how to identify chimney flashing leaks. We will cover the anatomy of a proper flashing system, the subtle interior signs of trouble, and how to perform a safe exterior inspection to catch the problem before it becomes a structural nightmare.
Understanding Chimney Flashing Anatomy
To identify a failure, you must first understand what “correct” looks like. A proper chimney flashing system is not just a single piece of metal; it is a layered system designed to shed water like shingles do. If your chimney lacks any of these components, it is likely the source of your leak.
1. Base Flashing
This is the L-shaped metal piece at the bottom of the chimney. One side extends under the shingles, and the other side bends up against the vertical brick face. It handles the water running down the roof.
2. Step Flashing
Used on the sides of the chimney that run parallel to the roof slope. These are individual L-shaped pieces of metal installed with each course of shingles. They are woven into the roof, ensuring water is directed on top of the shingle below it.
3. Counter Flashing (Cap Flashing)
This is the most visible part. It is embedded into the mortar joints of the chimney and hangs down over the base and step flashing. Its job is to prevent water from running behind the base flashing.
4. The Cricket (Saddle)
If your chimney is wider than 30 inches, code requires a “cricket”—a small peaked roof built behind the chimney to divert water around it. Without a cricket, water pools behind the chimney, inevitably causing leaks.
Interior Signs of a Flashing Leak
You don’t always need a ladder to find a leak. Your home’s interior often tells the story long before you climb on the roof. Grab a flashlight and look for these tell-tale signs.
The Ceiling Stain
The classic sign. Look for yellow or brown concentric rings on the ceiling directly near the fireplace. However, water travels. A stain three feet away from the chimney could still be from the flashing, as water runs along rafters before dripping.
The Dripping Firebox
If you hear dripping noises inside the fireplace during heavy rain, or find puddles in the firebox, the water is entering the flue. While this often points to a chimney cap issue, it can also be flashing that has failed at the very top corners.
Musty Odors
Damp soot smells terrible. If your fireplace smells like a wet campfire or mildew days after a rainstorm, moisture is trapped inside the masonry or the attic space surrounding the chimney.

General Tools Digital Moisture Meter
Don’t guess if a stain is old or new. A moisture meter allows you to touch drywall or masonry to detect active moisture content that isn’t visible to the naked eye. Essential for diagnosing hidden leaks.
Check Price on AmazonExterior Visual Inspection
Safety Warning: Inspecting a roof is dangerous. If you are uncomfortable with heights or have a steep roof pitch, hire a professional. You can perform a preliminary inspection from the ground using high-powered binoculars.
1. The “Tar” Job
Look for thick black gobs of roofing tar or mastic slathered around the base of the chimney. This is the #1 sign of a previous DIY repair that has failed. Tar dries out, cracks, and pulls away from the brick, creating funnels for water. Proper flashing uses metal and caulk, not tar.
2. Rust and Corrosion
Galvanized steel flashing eventually rusts. If you see reddish-brown stains or holes in the metal, the integrity is gone. Copper flashing turns green (patina), which is fine, but aluminum or steel should be painted or sealed.
3. Separated Caulk
Check the top edge of the counter flashing where it goes into the brick. The sealant there (often silicone or mortar) is the first line of defense. If you can stick a credit card into the gap between the metal and the brick, you have a leak.
4. Missing Pieces
High winds can rip loose flashing right off the chimney. Look for exposed wood, underlayment, or gaps where the roof meets the brick.
How to Perform a Water Test
If visual inspection reveals nothing obvious, but the leak persists, you can simulate rain to isolate the issue. You will need two people: one on the roof with a hose, and one in the attic or by the fireplace with a flashlight.
- Start Low: Do not just spray the whole chimney immediately. Start by running the hose on the roof shingles below the chimney. This rules out a roof leak further down.
- Test the Base: Move the hose to the base flashing (where the roof meets the chimney). Run water gently for 5-10 minutes. The spotter inside should yell if water appears.
- Test the Sides: Move to the step flashing on the sides.
- Test the Masonry: Finally, spray the bricks themselves. If the flashing doesn’t leak, but spraying the bricks causes water to enter, your issue is porous masonry, not flashing.

Heavy Duty Garden Hose Nozzle
Precision is key for water testing. A nozzle with an adjustable “soaker” or “shower” setting allows you to simulate rain without blasting water under the shingles with high pressure.
Check Price on AmazonFlashing Leak vs. Masonry Leak
A common diagnostic error is blaming the flashing when the bricks themselves are the problem. Bricks are like hard sponges; they absorb water. If the chimney lacks a waterproof coating, water can soak through the brick and bypass the flashing entirely.
The Clue: If the leak only happens during very long, wind-driven storms, it might be saturation (masonry). If it leaks quickly during a short downpour, it is likely a gap (flashing).
Common Causes of Flashing Failure
- House Settling: As your house foundation settles, the chimney and the house frame may move independently. This movement tears the flashing or breaks the sealant bond.
- Thermal Expansion: Metal expands in summer and contracts in winter. Over years, this cycle works nails loose and cracks caulk.
- Improper Installation: The most common cause. If the roofer used one solid piece of metal instead of step flashing, or relied on caulk instead of embedding the metal into the mortar, it will fail.
- Age: Even the best copper flashing eventually wears out. If your roof is 20+ years old, the flashing likely is too.
Essential Inspection Tools
To safely identifying chimney leaks, you need the right gear. Don’t rely on guesswork.
- Ladder with Stabilizer: Never lean a ladder against the chimney itself if it’s unstable. Use a stabilizer bar to rest on the roof.
- Non-Slip Shoes: Roofing grit is slippery. Use soft-soled shoes or roofing boots.
- Camera/Phone: Take pictures of everything. You will want to zoom in later on a computer screen to spot hairline cracks you missed in the glare of the sun.

Telescoping Ladder with Stabilizer
Safety is paramount. A telescoping ladder is easy to store, and models with stabilizer bars prevent the ladder from sliding sideways while you are inspecting the flashing.
Check Price on AmazonRepair vs. Full Replacement
Once you identify the leak, you have a choice: patch it or replace it.
When to Repair (Seal)
If the metal is in good shape (no rust) but the sealant at the top has cracked, you can simply remove the old caulk and apply a high-quality flashing sealant. This is a cheap, easy DIY fix.
When to Replace
If the metal is rusted through, missing, or installed incorrectly (e.g., no step flashing), no amount of “tar” will fix it. You must hire a professional to rip out the old system and install new copper or galvanized flashing. This typically costs between $500 and $1,500.
Frequently Asked Questions
Final Thoughts
Identifying a chimney flashing leak requires a bit of detective work, but catching it early is the single best way to protect your home’s structure. Whether it’s a simple recaulking job or a full metal replacement, addressing the issue now is far cheaper than replacing rotted roof decking later.
Remember, if you are ever in doubt about the source of the water or your ability to safely access the roof, call a CSIA-certified chimney sweep or a licensed roofer. Your safety—and your dry ceiling—are worth the investment.