Fireplace Smoke Coming Into House? A Step-by-Step Expert Guide to Find and Fix the Problem
There’s a romantic image we all have of a fireplace: cozy warmth, a crackling fire, and a relaxing ambiance. But when that idyllic scene is shattered by billows of thick, acrid smoke pouring into your living room, it’s more than just a nuisance—it’s frustrating, messy, and downright dangerous. A smoky fireplace is a clear sign that something is wrong with how your fireplace system is functioning, and ignoring it is not an option.
Fireplace smoke contains fine particulate matter, carbon monoxide, and other harmful compounds that you and your family should not be breathing. The good news is that in almost every case, a smoky fireplace is a solvable problem. The issue is rarely the fireplace itself but rather the physics of airflow and the condition of your chimney. It’s all about the “draft”—the upward flow of air that pulls smoke and gases out of your home.
This guide is your comprehensive, step-by-step diagnostic tool. We will walk you through the troubleshooting process exactly like a professional chimney sweep would, starting with the simplest user errors and moving toward more complex issues. By following these steps, you can identify the root cause of your smoke problem and learn how to fix it for good.
A Certified Chimney Sweep’s Safety Warning
As a CSIA (Chimney Safety Institute of America) Certified Chimney Sweep, I need to be blunt: A smoky fireplace is a dangerous fireplace. The smoke you see is an inconvenience, but the odorless, colorless carbon monoxide (CO) mixed with it can be deadly. If you have smoke coming into your house, your first step should be to extinguish the fire safely and ventilate the area. Your second step is to install and test carbon monoxide detectors. This guide will help you diagnose the issue, but for your family’s safety, never operate a fireplace that is not drafting correctly. When in doubt, call a professional from the list of best chimney services in your area.
First Things First: Quick Checks for Common User Errors
Before you start worrying about expensive repairs, let’s rule out the most common and easily fixable mistakes. A surprising number of smoke problems are caused by one of the following simple issues.
1. Is Your Damper Fully Open?
This may sound obvious, but it’s the number one cause of a smoky fireplace. The damper is a metal plate inside the chimney’s throat, just above the firebox, that is used to seal the chimney when not in use. If it’s closed or only partially open, the smoke has nowhere to go but back into your room.
- How to Check: Take a flashlight and look up into the throat of your (unlit!) fireplace. You should see a handle or a knob. Operate it and look for the metal plate. You need to see a clear, unobstructed path going straight up.
- Types of Dampers: Some are “poker” or “rotary” style inside the firebox, while others (“top-sealing” dampers) are operated by a chain hanging down the side of the flue. Make sure you know which type you have and that it’s opening completely.
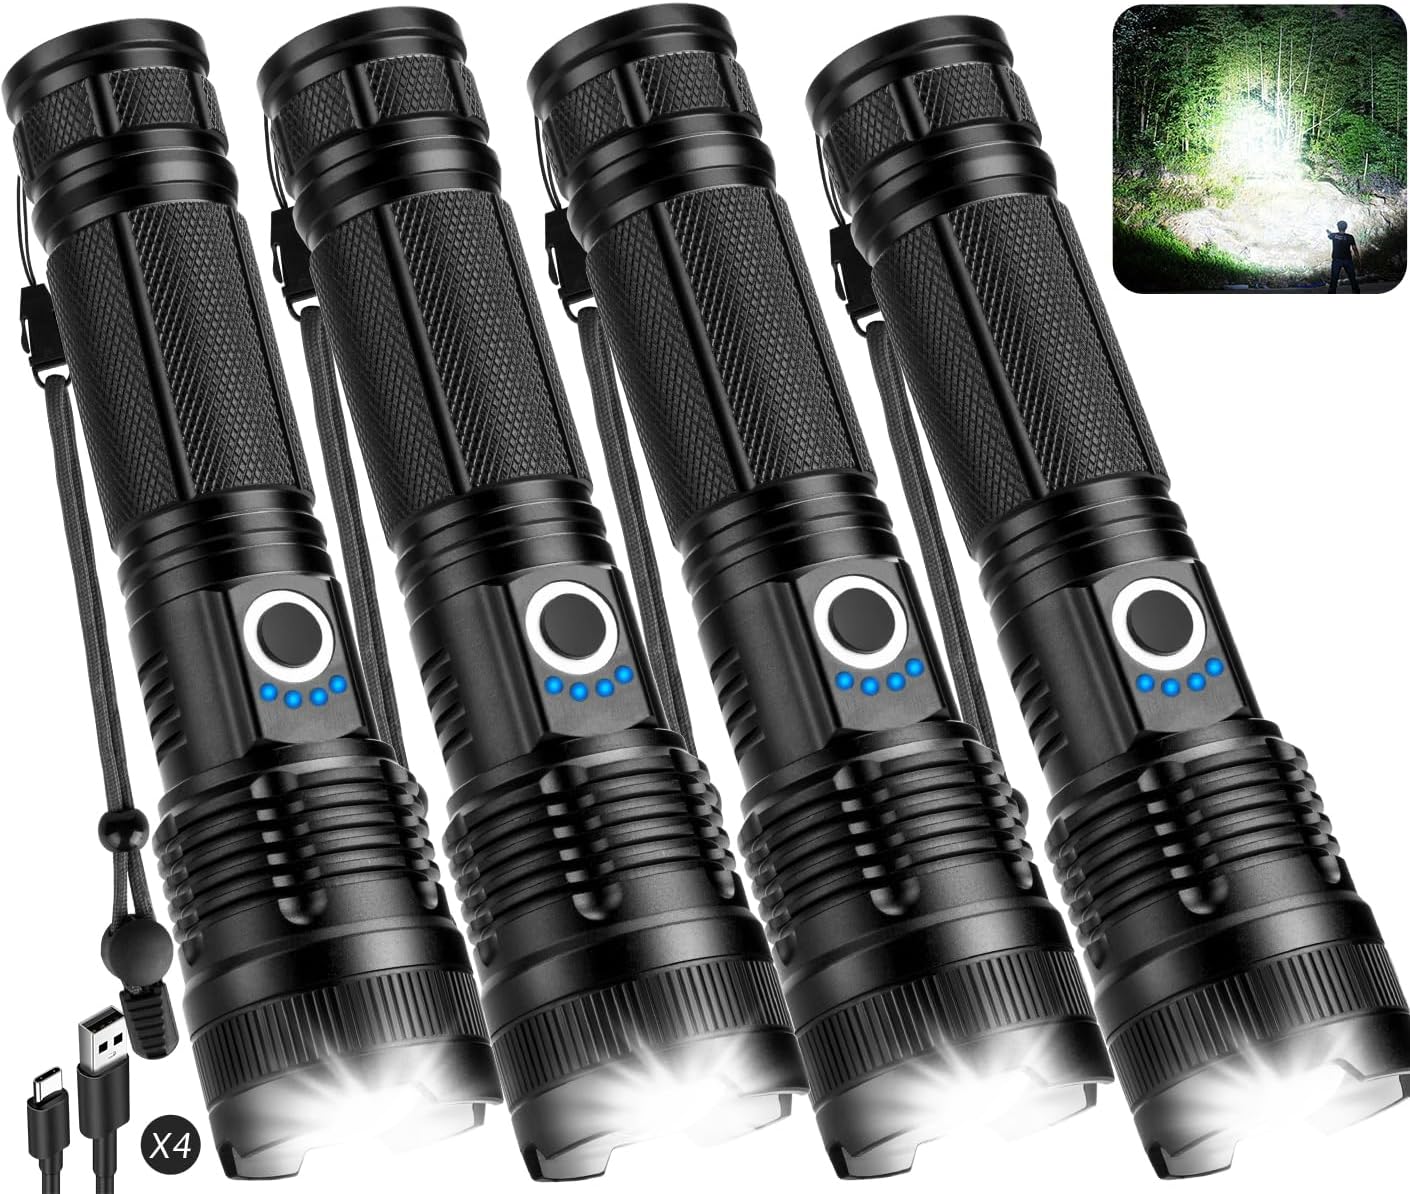
Essential Diagnostic Tool: High-Lumen LED Flashlight
You can’t fix what you can’t see. A powerful flashlight is your best friend for fireplace troubleshooting. It’s essential for getting a clear view of your damper, looking up the flue for obvious blockages like a bird’s nest, and inspecting the firebox for cracks. Don’t rely on your phone’s light; get a dedicated, bright flashlight.
Check Price on Amazon2. Are You “Priming the Flue”? The Cold Air Plug
This is a huge issue, especially for chimneys on an exterior wall of the house in cold climates. Overnight, a column of heavy, cold air can settle in your chimney. When you light a fire, the hot, buoyant smoke isn’t strong enough to push this “cold air plug” out of the way, so it spills back into the room.
- The Solution (Priming): Before you light the logs, you need to warm up the flue to break the plug and establish a draft. The easiest way is to roll up a piece of newspaper, light one end, and hold it up in the throat of the chimney past the damper for a minute or two. You will literally see the smoke from the newspaper start to get pulled upwards. Once that happens, you have successfully established a draft and can safely light your fire.
💡 Pro Tip: Two-Stage Priming for Stubborn Cold Flues
If one newspaper torch doesn’t do the trick on a brutally cold morning, don’t give up—try a two-stage approach. After your first torch, let the flue rest for two minutes, then repeat with a second torch. The cumulative warming effect is dramatically more powerful. Some chimney professionals also recommend holding the torch slightly higher into the damper opening to target the coldest section of flue more directly. As soon as you feel the draft reverse and start pulling upward, light a small kindling fire first and let it burn vigorously for five to ten minutes before adding larger logs. This gradual warm-up prevents the draft from collapsing when the big logs cool things down momentarily.
3. Is Your Firewood Properly Seasoned?
Burning wet or “green” wood is a recipe for a smoky disaster. Well-seasoned wood should have a moisture content below 20%. Wet wood does two bad things:
- It Smolders: The fire wastes its energy boiling off water instead of burning cleanly. This low-temperature combustion creates an enormous amount of thick, heavy smoke.
- It Doesn’t Produce Enough Heat: The smoke isn’t hot enough to rise quickly and establish a strong draft, allowing it to linger and spill out of the fireplace opening.
If your fire is hissing and sizzling, your wood is likely too wet. To learn how to identify and source the right fuel, consult this guide on the best firewood for your fireplace.

Stop Guessing, Start Measuring: Wood Moisture Meter
This simple tool is the only way to know for sure if your wood is ready to burn. Don’t rely on appearance or how long it’s been stacked. Split a piece of wood and press the prongs into the freshly exposed face. If the reading is over 20%, the wood will cause smoke problems and create dangerous creosote. This is a must-have for any serious wood-burner.
Check Price on Amazon4. How Are You Building Your Fire?
Fire-building technique has a surprisingly large impact on whether smoke stays in or goes out. Many homeowners stack logs haphazardly and expect the fire to sort itself out. In reality, poor construction is a common reason why smoke enters the room, especially in the early minutes of a burn.
The top-down fire method is widely regarded as the most effective technique for minimizing smoke. Instead of placing kindling under the logs, you place your largest logs on the bottom, medium logs across them, and kindling and fire starters at the very top. You light the top, which creates immediate heat that preheats the flue before the main logs catch. The fire burns downward, producing very little smoke compared to a traditionally built bottom-up fire. If your fireplace routinely smokes during startup but then clears up, switching to the top-down method may eliminate the problem entirely.
Additionally, always make sure there is adequate airflow between the logs. Wood needs oxygen to combust cleanly. Logs stacked too tightly smother the fire, causing it to smolder rather than burn hot and clean.
The Most Common Culprit: A Blocked or Dirty Chimney
If you’ve ruled out user error, the next and most likely cause is an obstruction in the chimney flue. A chimney is like a straw; if it’s clogged, nothing can get through.
1. Level 3 Creosote Buildup
Every time you burn wood, it produces soot and tarry residue called creosote. Over time, this builds up on the inside of your flue. In its final stage, “glazed” creosote is thick, hard, and crusty. It can significantly narrow the flue opening, restricting airflow and causing smoke to back up. More importantly, creosote is extremely flammable and is the primary fuel for dangerous chimney fires.
- The Solution: You must have your chimney professionally swept at least once a year. A certified sweep will use specialized tools, like the best chimney brush for your liner, and a powerful chimney sweep vacuum to remove this buildup safely and cleanly.
Understanding the Three Stages of Creosote
Not all creosote is the same. Professionals classify it into three distinct degrees, and the stage you’re dealing with determines both the risk level and the method of removal:
- First-Degree Creosote: A loose, flaky, sooty deposit. It’s the least dangerous form and is easily brushed away during a standard annual cleaning. It looks a lot like ash and is the natural result of normal wood-burning. Frequent fires and dry, seasoned wood tend to produce only first-degree creosote.
- Second-Degree Creosote: A harder, shiny, tar-like flake that resembles black cornflakes stuck to the flue walls. It’s harder to remove than first-degree and requires specialized brushes or rotating tools. It forms when flue temperatures drop and smoke condenses against the walls—typically when burning too much wet wood or running fires at too low a temperature. Second-degree creosote is significantly more flammable than the first stage.
- Third-Degree Creosote (Glazed Creosote): This is the most dangerous form—a thick, tar-like coating that appears almost like shiny black paint on the flue walls. It’s extremely difficult to remove and resists standard brushing. Professional-grade chemical treatments are required to soften it before it can be scraped away. Third-degree creosote burns at extremely high temperatures and is responsible for the most catastrophic chimney fires. If a sweep identifies this in your flue, do not use the fireplace until it is fully addressed.
2. Animal Nests and Debris
Birds (especially Chimney Swifts) and squirrels love to make their homes inside the dark, protected space of a chimney. They can bring in a huge amount of twigs, leaves, and other debris, creating a total blockage. Leaves and branches can also fall into an uncapped chimney.
- The Solution: A professional needs to remove the blockage. If you suspect an animal is inside, it’s best to call a professional; find out who to contact when a bird is stuck in your chimney as humane removal may be required.
- The Prevention: This problem is 100% preventable by installing a high-quality chimney cap. A cap has a solid top to block rain and mesh sides to keep animals and debris out while allowing smoke to escape. Investing in one of the best chimney caps for rain is one of the smartest things a homeowner can do.
3. Collapsed or Dislodged Flue Tiles
The interior of a masonry chimney is lined with clay tiles that form the actual flue—the pathway smoke travels through. Over time, these tiles can crack, shift, or even collapse, especially after a chimney fire, a lightning strike, or years of freeze-thaw cycles in cold climates. When pieces of tile fall and pile up inside the flue, they create a physical obstruction that blocks smoke from escaping, regardless of how well your fire is burning. This is a serious issue because fallen tiles are not always visible from below, and the damage to the liner itself poses an independent fire and CO hazard. A professional video inspection is the only reliable way to diagnose this problem.
The Invisible Foe: Negative Air Pressure in Your Home
This is a complex topic, but it’s one of the most common causes of fireplace draft problems in modern, tightly-sealed homes. Your fireplace needs a huge volume of air to burn and to carry the smoke up the chimney. If your house is too airtight, the fireplace can’t get enough “makeup air.”
Worse, other appliances in your home are also competing for air, and they often win. Things like:
- Bathroom exhaust fans
- A powerful kitchen range hood
- A clothes dryer
- A furnace or hot water heater
When these appliances run, they suck air out of your house, creating “negative pressure.” This negative pressure can be so strong that it literally pulls air down your chimney, bringing smoke with it.
- The Quick Test: The next time your fireplace starts to smoke, turn off all the appliances listed above and crack a window or door in the same room as the fireplace. If the smoke problem immediately clears up, you’ve found your culprit: negative pressure.
- The Long-Term Solution: For persistent issues, you may need a dedicated “makeup air kit” installed, which provides a direct source of outside air for your fireplace. This is a job for a professional.
How Energy-Efficient Home Improvements Make Smoke Problems Worse
This counterintuitive reality catches many homeowners off guard. You’ve just invested thousands of dollars making your home more energy-efficient—new triple-pane windows, fresh weather stripping on every door, improved attic insulation, and spray-foam around all the penetrations. Your energy bills dropped dramatically. And then your fireplace, which worked perfectly for a decade, started pouring smoke into the living room.
What happened? The old, leaky version of your home was constantly supplying the fireplace with makeup air through all those gaps. The new, tight version has essentially starved the fireplace of the air it needs to function. The chimney tries to pull air from wherever it can, and the path of least resistance is often down the chimney itself. This “stack effect reversal” is especially common in basements and lower floors, where ground-level pressure dynamics work against an upward draft.
Solutions for this scenario include:
- Installing a dedicated outdoor air supply duct connected directly to the firebox (often called a combustion air intake or outside air kit)
- Opening a window at least one inch in the same room as the fireplace before and during use
- Installing a top-sealing damper that creates a tighter seal when the fireplace is not in use, preventing conditioned air from being lost up the chimney between fires
Damaged Flue Liner: A Hidden but Serious Cause
The flue liner is the workhorse of your chimney system. Its job is to contain the hot combustion gases, insulate the surrounding masonry from extreme heat, and provide a smooth, consistent passage that promotes strong upward draft. When the liner is damaged, all three of those functions are compromised simultaneously.
What Causes Flue Liner Damage?
Flue liners take a beating over the years. The most common causes of damage include:
- Chimney Fires: Even a relatively small, undetected chimney fire can crack or shatter clay tiles throughout the length of the flue. The rapid, extreme temperature spikes cause thermal shock that the tiles are not designed to withstand repeatedly.
- Freeze-Thaw Cycling: Water that seeps into hairline cracks freezes in winter, expands, and widens the crack. Over multiple winters, small cracks become large fractures, and large fractures become tile failures.
- Acidic Condensate: When flue temperatures drop below the dew point (which happens frequently with oversized flues, wet wood, and low-temperature fires), acidic water condenses on the liner walls. Over years, this acid eats away at the clay and mortar joints holding the tiles together.
- Age and Settlement: Masonry chimneys naturally settle over decades as a house ages. This movement can cause tile joints to open up and individual tiles to shift out of alignment, creating gaps in the liner.
How a Damaged Liner Causes Smoke to Enter the House
When there are gaps, cracks, or holes in the flue liner, cold outside air can infiltrate through the surrounding masonry and into the flue at those points. This cold air mixes with the rising warm exhaust, cools it down, and weakens the buoyancy-driven draft. In severe cases, the infiltrating cold air can completely overwhelm the draft, causing smoke to reverse direction and spill into the firebox and then into the room. The solution is to reline the chimney with a new stainless steel liner, which eliminates all gaps, provides excellent insulation to maintain flue temperature, and restores a smooth, correctly-sized passage for smoke to travel through.
Multi-Flue Chimneys: A Sneaky and Often Overlooked Problem
Many homes have a single chimney structure that contains two or more separate flues running side by side—one for the main fireplace, one for a second fireplace in another room, and perhaps a third for a furnace or boiler. This configuration creates a specific type of smoke problem that puzzles homeowners and even stumps some inexperienced contractors.
Cross-Flue Contamination
Here’s how it works: when you light your main fireplace, smoke rises up the active flue. Meanwhile, the second flue next to it is cold and filled with heavy, dense cold air. That cold air column is under higher pressure at the bottom than the warm air in the active flue. This pressure difference can literally pull smoke sideways out of the active flue and push it down the cold flue, where it exits through whatever opening that flue connects to—another fireplace in a different room, an old furnace connection, or even a crack between the two flues inside the chimney structure.
The Diagnosis: If smoke is mysteriously appearing in a room that has no active fire—especially a room with a second fireplace or an old furnace—multi-flue cross-contamination is the likely culprit. Check whether the smoke appears in that room at the same time you’re using your main fireplace.
The Solutions:
- Ensure the damper on the unused fireplace’s flue is fully closed. A tight damper stop the cold air from being drawn down.
- For a more permanent fix, install a top-sealing damper on the unused flue. These provide a far tighter seal than the standard throat damper and are operated by a chain from inside the firebox.
- If there are cracks or gaps in the masonry wythe (the physical separation between the two flues), the chimney may need to be relined. A damaged or absent wythe allows direct smoke transfer between flues and represents a serious fire hazard.
Wind-Induced Downdraft: When the Weather Is to Blame
Some homeowners only experience smoke problems on windy days. Their fireplace works beautifully in calm conditions but becomes unusable whenever the wind picks up. This is a clear signature of wind-induced downdraft, and understanding why it happens is key to fixing it.
How Wind Creates Downdraft
When wind blows across the top of a chimney, it doesn’t just pass harmlessly overhead. Depending on the wind direction and the shape of the surrounding roofline, the wind can create a zone of turbulence directly above the chimney opening. This turbulence generates a low-pressure area on the downwind side of the chimney top and a high-pressure area on the upwind side. The net result is that air is pushed down into the flue from the upwind side, opposing the upward draft the fire needs. Strong enough wind pressure can completely overpower the thermal draft and drive smoke back down into the firebox and out into the house.
Contributing Factors to Wind Downdraft
- Chimney Too Short: Building codes require a chimney to extend at least 3 feet above the roof surface at its exit point and to be at least 2 feet taller than any roof structure or obstacle within 10 feet. A chimney that just barely meets these minimums may still be too short in areas with consistently strong winds, or where the roofline creates unusual turbulence patterns.
- Nearby Tall Trees: Trees that are taller than the chimney and close to the house—within 10 to 15 feet—can deflect wind in ways that funnel it directly down the flue. Trimming or removing overhanging branches can sometimes resolve the problem without any chimney work.
- Neighboring Structures: A tall addition, a new neighbor’s two-story house, or even a large shed built near your chimney can alter local wind patterns and create downdraft conditions that never existed before.
- Steep or Complex Rooflines: Hip roofs, cathedral ceilings, and dormers can all create localized wind turbulence that affects chimney draft in unpredictable ways.
Solutions for Wind Downdraft
The most effective first step is installing a wind-resistant or anti-downdraft chimney cap. Unlike a standard cap, which simply covers the opening, a wind-resistant cap is engineered with baffles and directional inlets that prevent any wind angle from pushing air directly down the flue. These caps work by redirecting incoming wind parallel to the flue or across it rather than into it, allowing smoke to escape regardless of wind direction. For chimneys that are genuinely too short, extending the chimney by adding additional flue sections and a new crown is the permanent solution. This is masonry or metalwork that must be done by a qualified professional.
The Toughest Cases: Structural & Design Flaws
If you’ve exhausted all the options above, your smoke problem might be related to the actual construction of your fireplace and chimney. These issues almost always require professional intervention.
- Incorrect Chimney Height: Building codes require a chimney to be at least 3 feet above the roofline where it exits, AND 2 feet taller than anything within a 10-foot radius. If it’s too short, wind can blow down the chimney, forcing smoke back into the house.
- Improper Flue-to-Firebox Ratio: There’s a specific mathematical relationship between the size of the fireplace opening and the size of the chimney flue. If the flue is too small for the firebox, it simply can’t handle the volume of smoke produced.
- House Renovations: Did you recently install new, energy-efficient windows? Remodel your kitchen with a powerful range hood? These changes can make a previously well-drawing fireplace suddenly smoky by making the house more airtight.
For these issues, you will need to call in a certified chimney sweep or mason. They may need to extend the chimney, resize the flue with a new liner, or repair masonry with the best mortar for the job.
The 1/10 Rule: Flue Size and Fireplace Opening
Professional chimney designers rely on a principle known as the 1/10 rule (sometimes expressed as a 1/8 to 1/12 range depending on flue shape and height) when sizing a chimney. The principle states that the cross-sectional area of the flue should be roughly one-tenth of the area of the fireplace opening. So if your fireplace opening measures 36 inches wide by 30 inches tall (1,080 square inches), the flue should have a cross-sectional area of at least 108 square inches.
Many older homes were built before these ratios were well understood, and it is not uncommon to find fireplaces with massively undersized flues that have been causing smoke problems since the day they were built. The homeowners simply assumed it was normal and lived with it. If your fireplace has always smoked and no amount of troubleshooting helps, a flue sizing issue may be the original sin. A certified chimney professional can calculate the ratio for your specific fireplace and determine whether relining with a correctly sized flue is the appropriate remedy.
Firebox Geometry and the Smoke Shelf
The interior shape of the firebox itself plays a critical role in draft performance. A properly designed firebox has angled rear walls that curve upward and forward toward the throat, directing combustion gases toward the damper opening. The “smoke shelf” is a horizontal ledge located just behind the damper that serves two important functions: it catches falling debris and rain before it hits the fire, and it buffers the transition between the warm updraft and any cooler downdrafts entering the chimney from above.
If the smoke shelf is clogged with years of accumulated debris, leaves, and soot, its buffering function is compromised and downdrafts can pass through more easily. If the firebox walls are damaged, have been improperly repaired, or the geometry was compromised during a renovation, the smoke may not be directed toward the throat efficiently, creating turbulence that sends some smoke out into the room. Inspecting and cleaning the smoke shelf is part of a thorough annual chimney service and is not something most homeowners can do themselves.
Understanding the Smoke Chamber
Above the firebox throat and smoke shelf lies the smoke chamber—a funnel-shaped space that compresses and accelerates the rising combustion gases before they enter the narrower flue above. Think of it as the transition zone between the wide firebox and the comparatively narrow chimney flue. A well-designed smoke chamber is smooth, correctly angled, and properly sized. Problems here are a frequently missed cause of chronic smoke spillage.
Common Smoke Chamber Problems
The most common smoke chamber problem in older masonry fireplaces is a rough, stepped, or corbeled interior. Instead of smooth, gradually sloping walls that guide gases cleanly upward, the smoke chamber was built with rough brick surfaces and right-angle steps. These surfaces create turbulence that slows the rising gases, reduces draft velocity, and allows smoke to eddy and spill forward out of the firebox opening. The fix is a process called smoke chamber parging—applying a smooth coat of specialized refractory mortar to the rough interior walls to create the smooth, aerodynamic surface the smoke chamber needs to function properly.
A smoke chamber that is undersized relative to the firebox opening is another design flaw that causes smoke problems. If the chamber is too small, the combustion gases can’t be compressed and accelerated efficiently. This is a more complex fix that may require significant masonry work.
Fireplace Glass Doors and Their Impact on Smoke
Fireplace glass doors are a popular addition that improves energy efficiency and reduces the amount of conditioned air lost up the chimney when the fireplace is not in use. However, improperly used glass doors are also a surprisingly common cause of smoke problems, and this topic deserves careful attention.
Should the Doors Be Open or Closed While Burning?
This is one of the most frequently asked questions about glass-door fireplaces, and the answer depends on the type of doors and the specific fireplace design. For most traditional open masonry fireplaces with glass doors, the doors should be kept open while a fire is actively burning. Closing the doors restricts the air supply to the fire, causing it to burn at a lower temperature, produce more smoke, and potentially draw smoke into the room through any gaps around the door frame. Keeping doors open allows the fire to breathe and maintains a strong draft.
As the fire dies down to embers at the end of the evening, closing the doors at that stage makes sense—it prevents smoke from embers from drifting into the room as the fire temperature drops and the draft weakens, while also stopping radiant heat from escaping up the chimney.
When Glass Doors Can Actually Help
There is one scenario where partially or fully closing glass doors during a fire can be a legitimate smoke management strategy: when the fireplace has a minor design flaw that causes it to smoke only when the fire is very small or burning low. In this case, the doors can be closed just enough to reduce the effective opening size, which increases the velocity of air entering the firebox at the bottom (through the built-in vents) and improves the ratio between opening size and flue size. However, this should be considered a workaround rather than a fix, and the doors must be properly rated for use with an open fire—not all glass door sets are designed for this purpose.
Improperly Fitted Doors
Glass doors that don’t seal tightly against the fireplace surround can create unexpected airflow patterns that disrupt draft. Gaps around the edges allow cold room air to infiltrate the firebox from multiple directions rather than in a controlled flow from below, creating turbulence that pushes smoke forward. If your glass doors are old, warped, or were never properly sized for your firebox, having them professionally refitted or replaced may resolve a persistent smoke problem.
The Health Effects of Indoor Fireplace Smoke: Why This Matters
Many homeowners underestimate the health consequences of a smoky fireplace, dismissing it as a temporary inconvenience. The reality is more serious. Wood smoke is a complex mixture of gases and fine particles that poses real risks to human health, especially with prolonged or repeated exposure.
Fine Particulate Matter (PM2.5)
The primary health concern from wood smoke is fine particulate matter—particles smaller than 2.5 micrometers in diameter (PM2.5). These tiny particles are small enough to bypass the nose and throat’s natural filtration systems and penetrate deep into the lungs. Long-term exposure to elevated indoor PM2.5 levels is associated with reduced lung function, aggravated asthma and chronic obstructive pulmonary disease (COPD), increased cardiovascular risk, and in vulnerable populations, serious respiratory illness. Children, elderly individuals, and anyone with pre-existing respiratory or cardiovascular conditions are at heightened risk.
Carbon Monoxide
Carbon monoxide (CO) is the invisible killer associated with all combustion appliances, including fireplaces. Unlike the visible smoke particles, CO is colorless, odorless, and completely undetectable without a dedicated detector. When a fireplace doesn’t draft properly, CO-laden exhaust gases enter the living space alongside the visible smoke. At low concentrations, CO causes headaches, nausea, and dizziness. At higher concentrations, it causes loss of consciousness and can be fatal within minutes. Every home with a fireplace must have CO detectors installed on every level, with detectors placed near sleeping areas. These should be tested monthly and replaced according to manufacturer specifications.
Volatile Organic Compounds and Benzene
Wood smoke also contains a range of volatile organic compounds (VOCs) including benzene, formaldehyde, and polycyclic aromatic hydrocarbons (PAHs). Several of these are classified as known or probable carcinogens. While a single evening of fireplace smoke is unlikely to cause lasting harm to a healthy adult, households that frequently experience smoke intrusion from a faulty fireplace are accumulating exposure over time that warrants serious attention. Ventilate thoroughly, address the problem promptly, and do not use a fireplace that is actively sending smoke into your living space.
Preventing Smoke Problems Year-Round
The most cost-effective approach to a smoky fireplace is not fixing problems after they occur—it’s establishing a maintenance routine that prevents problems from developing in the first place. A well-maintained fireplace and chimney system is dramatically less likely to cause smoke intrusion than a neglected one.
Annual Inspection and Cleaning Schedule
The National Fire Protection Association (NFPA 211) standard recommends that chimneys, fireplaces, and vents be inspected at least once a year and cleaned when necessary. This annual service should be performed by a CSIA-certified chimney sweep and should include a full visual inspection of the firebox, damper, smoke chamber, smoke shelf, and accessible portions of the flue. The sweep will remove creosote, soot, and debris, check for structural cracks, and identify any issues before they become serious problems or safety hazards.
Spring Service (After Season Ends)
Schedule your annual professional sweep and inspection in spring, right after the burning season ends. Creosote is more corrosive during the warm months when moisture interacts with it—getting it cleaned out promptly protects the liner.
Summer Check (Mid-Season)
Inspect the chimney cap, crown, and exterior masonry for weather damage, cracks, or signs of moisture intrusion. Address any issues before the burning season returns.
Fall Readiness (Before First Fire)
Test your CO detectors, check and operate the damper to confirm it opens and closes fully, look up the flue with a flashlight for visible obstructions, and confirm your wood supply has a moisture reading below 20%.
During-Season Monitoring
Monitor your fires for unusual amounts of smoke, odd odors, or changes in draft behavior. These are early warning signs that something is changing inside the flue and warrants attention before the next fire.
Wood Storage and Seasoning Best Practices
Properly seasoning your own firewood is one of the highest-value things you can do to prevent smoke problems. Freshly cut wood typically contains 40% to 60% moisture by weight. To burn cleanly, that moisture needs to be reduced below 20%—a process that takes a minimum of six months for most hardwoods and up to two years for very dense species like oak and hickory if not properly managed.
For optimal drying, split your wood as soon as possible after cutting—split wood dries far faster than rounds. Stack it in a single row (not a thick pile) in a sunny, windy location with good airflow. Elevate the bottom row on pallets or rails to prevent ground moisture from wicking upward. Cover the top of the stack with a waterproof tarp or roofing material, but leave the sides open to allow airflow. Never store firewood indoors or in an enclosed area without ventilation, as this slows drying dramatically and can introduce insects into the home.
Chimney Cap Maintenance
Your chimney cap is your first line of defense against debris, animals, rain, and wind-driven downdraft. Inspect it visually from the ground at least twice a year and look for: mesh that is pulling away from the cap body, gaps that would allow small animals or debris to enter, rust or corrosion that has weakened the structure, and any signs of the cap having shifted or become loose. A damaged chimney cap should be replaced promptly—it is a relatively inexpensive component that prevents problems far more costly than its replacement cost.
Chimney Crown and Flashing
The chimney crown is the concrete or mortar cap that covers the top of the chimney structure (not the cap that covers the flue opening—this is the larger masonry structure around it). A properly built crown overhangs the chimney walls slightly, directing water away from the masonry below. Cracks in the chimney crown allow water to penetrate the chimney structure, where it damages mortar joints, corrodes the flue liner, and causes spalling brickwork. Water inside the chimney structure cools the flue, worsens draft, and over time undermines the structural integrity of the entire chimney.
Similarly, the chimney flashing—the waterproof seal between the chimney and the roof surface—is a common source of water intrusion. If the flashing has separated from the chimney or roofing material, water runs down inside the chimney structure rather than being shed over the roof. Annual inspection of both the crown and flashing is a key element of chimney maintenance that directly affects the long-term performance and safety of your fireplace.
When to Call a Professional: Knowing Your Limits
DIY troubleshooting is valuable, and many smoke problems can be solved by a knowledgeable homeowner. But there are clear situations where calling a certified chimney professional is not just advisable—it’s mandatory for safety.
| Problem Type | DIY Fix? | Why or Why Not |
|---|---|---|
| Damper closed / stuck | Often yes | Accessible from inside firebox; basic tools may suffice. Replacement is professional work. |
| Cold air plug / priming | Yes | Burning newspaper technique is safe and effective for homeowners. |
| Wet firewood | Yes | Purchase seasoned wood or wait for your wood to dry below 20% moisture. |
| Negative pressure test | Yes | Cracking a window is a free and instant diagnostic step. |
| Creosote buildup (any degree) | No | Specialized tools, safety equipment, and expertise required. Third-degree creosote requires chemical treatment. |
| Animal nest or debris blockage | No | Working in a confined flue is hazardous; wildlife removal may require professional licensing. |
| Cracked or failed flue liner | No | Video inspection and relining require certified professionals and specialized equipment. |
| Multi-flue cross-contamination | No | Diagnosing inter-flue smoke travel requires inspection of the full chimney structure. |
| Chimney too short | No | Structural masonry or metalwork at height requires licensed professionals and often permits. |
| Flue sizing mismatch | No | Calculation, liner sizing, and installation require certified expertise. |
What to Expect From a Professional Chimney Inspection
A comprehensive professional chimney inspection is classified by the NFPA into three levels. Understanding the difference helps you ask for the right service when you call:
- Level 1 Inspection: A visual examination of all readily accessible portions of the chimney exterior, interior, and accessible attic and crawlspace areas. This is appropriate when the chimney has been in regular use with no known problems and no changes to the system or home have been made. It’s the standard annual inspection most homeowners should be getting.
- Level 2 Inspection: Includes everything in Level 1 plus a video scan of the flue interior using specialized camera equipment. This level is required when there has been a change to the system (new liner, new appliance, fuel type change), when the property is being sold, or when a Level 1 inspection reveals a reason for concern. A Level 2 is also required after any event that may have affected the chimney—chimney fire, severe weather, seismic activity.
- Level 3 Inspection: The most invasive level, this includes removal of portions of the building structure (wall, ceiling, or chimney components) to gain access for complete examination. This level is only performed when there is reason to believe concealed damage exists that cannot be assessed through Level 1 or 2 methods.
Tired of the Smoke? Modern Alternatives
If you love the idea of a fireplace but are tired of the maintenance and risks associated with wood, there are fantastic smoke-free alternatives. The electric fireplace vs wood fireplace debate often comes down to convenience, and electric units offer ambiance with zero smoke or cleanup. Alternatively, understanding the various gas fireplace venting options can lead you to a solution with real flames but none of the smoke spillage issues.
Gas Fireplace Inserts: Real Flames, Zero Smoke
A gas fireplace insert is one of the most popular solutions for homeowners who want to retain their existing fireplace opening but eliminate smoke problems permanently. An insert is a sealed combustion unit that fits into the existing firebox. It uses either natural gas or propane to produce real flames over ceramic logs or glass media. The combustion gases are vented through a dedicated liner that runs up the existing chimney—completely sealed from the room. There is simply no path for combustion gases to enter the living space under normal operating conditions.
Beyond eliminating smoke, gas inserts offer significant advantages in heating efficiency. Where a traditional wood fireplace operates at 10% to 15% heating efficiency (most of the heat goes up the chimney), a direct-vent gas insert typically operates at 70% to 85% efficiency. They also provide on-demand heat with a thermostat and remote control, making them far more practical as a primary or supplemental heat source.
Wood-Burning Inserts: More Control, Less Smoke
For homeowners who specifically want the experience of burning real wood, a wood-burning insert is an excellent middle ground. Like a gas insert, it fits into the existing firebox as a sealed unit with its own dedicated liner. The sealed firebox design and precision air control vents allow the fire to burn much hotter and more completely than an open fireplace, which dramatically reduces smoke production and creosote formation. A well-operated wood insert with dry, seasoned wood produces very little visible smoke and is far less likely to experience draft problems than a traditional open fireplace.
Electric Fireplaces: Complete Simplicity
For spaces where a vented appliance isn’t practical—a bedroom, a finished basement, a rental apartment—an electric fireplace offers the visual warmth of a fire with zero combustion, zero smoke, and zero maintenance beyond occasional dusting. Modern electric fireplaces use LED technology and water vapor or light projection to create surprisingly realistic flame effects. While they don’t provide the sensory experience of a real fire, they are completely safe, require no chimney, and can provide useful supplemental heat through a built-in electric resistance heater.
Your Step-by-Step Troubleshooting Checklist
- Safety First: Ensure CO detectors are working. Extinguish the fire and ventilate.
- Check the Damper: Use a flashlight to confirm it is 100% open.
- Prime the Flue: Use a burning newspaper to warm the chimney before lighting the fire.
- Check Your Wood: Use a moisture meter. Is your firewood below 20% moisture?
- Review Your Fire-Building Method: Switch to the top-down method to reduce startup smoke.
- Test for Negative Pressure: Crack a window in the room. Does the smoke stop?
- Turn Off Competing Appliances: Disable exhaust fans, range hoods, and the dryer during fireplace use.
- Check for Wind-Related Timing: Does the problem only occur on windy days? Consider a wind-resistant cap.
- Check Second Flues: Is smoke appearing in another room? Close or add a top-sealing damper to unused flues.
- Look for Obvious Blockages: (From the ground with a flashlight) Can you see daylight or a bird’s nest?
- Review Your Calendar: Has it been over a year since your last professional chimney sweep?
- Call a Professional: If you’ve gone through this list and still have a problem, it’s time to call in an expert for a Level 2 inspection with video scanning.
Frequently Asked Questions About Smoky Fireplaces
Q: Why does my fireplace only smoke when it’s windy?
A: This is often a sign that your chimney is too short or is being affected by nearby structures or trees that are causing turbulence. The wind blowing over the top of the chimney creates a downdraft. A specialized wind-resistant chimney cap or extending the chimney height can often solve this.
Q: Why does my fireplace smoke only on startup and then it gets better?
A: This is the classic symptom of a “cold air plug” in the flue. The initial smoke can’t push the cold air out, but once the fire gets hot enough, it eventually establishes a strong draft and the problem resolves itself. Priming the flue with a newspaper torch before you light your logs will fix this every time.
Q: Can I close my damper a little bit to make the fire burn longer?
A: No, this is a dangerous practice. While it might slow the burn, it also restricts the flow of exhaust gases, which can cause them to spill back into the room. A fireplace damper is not like the air control on a wood stove; it should be fully open anytime there is a fire or even hot embers in the fireplace.
Q: Can I fix a smoky fireplace myself?
A: You can certainly fix problems related to user error (damper, wet wood, priming the flue) and negative pressure (cracking a window). However, any issues related to blockages, creosote, or structural problems require a certified professional. Working on chimneys is dangerous, and improper cleaning can be ineffective and unsafe.
Q: My fireplace smoked once after months of working fine. Should I be worried?
A: A single isolated incident may be explained by an unusual weather event (strong downdraft wind), accidentally burning wet wood, or a momentary negative pressure spike from running multiple exhaust appliances simultaneously. If it was a one-off event that hasn’t recurred, monitor closely but don’t panic. If it happens again, work through the troubleshooting checklist systematically. Recurring unexplained smoke always warrants a professional inspection.
Q: Why does my fireplace smell like smoke even when it’s not in use?
A: A smoky odor with no fire present usually points to one of three causes: the damper is not sealing properly and outside air carrying residual creosote odors is infiltrating the home; there is significant creosote or soot buildup that is off-gassing, especially in humid weather; or water is entering the flue and reactivating dried creosote deposits, releasing a distinctively acrid smell. Hot, humid summer days are notorious for activating chimney odors even in fireplaces that draft perfectly well in winter. Addressing the source—whether it’s a damper replacement, a professional cleaning, or a new chimney cap to prevent water entry—is the only lasting fix.
Q: My smoke problem started after I had new energy-efficient windows installed. Is that really connected?
A: Yes, absolutely. This is a very common sequence of events. Old drafty windows were quietly supplying your fireplace with makeup air through dozens of small gaps. The new, tight windows eliminated those gaps, and now the fireplace can’t get the air it needs. The result is negative pressure that pulls air down the chimney instead. Cracking a window in the room during fireplace use is the immediate fix. A permanent solution is having a dedicated combustion air intake installed by a professional.
Q: Is it normal for a little smoke to come out of the fireplace when I first light it?
A: A small puff of smoke during the very first moments of lighting—before the fire has had a chance to establish a draft—is relatively common, especially in cold weather with exterior chimneys. It should clear within 30 to 60 seconds as the flue warms up. If it takes longer, or if smoke continues to enter the room after the fire is well established, that is not normal and warrants investigation.
Q: How do I know if I’ve had a chimney fire?
A: Chimney fires range from dramatic (loud roaring sound, visible flames and sparks from the chimney cap) to silent (slow, smoldering fires that a homeowner may never notice). Signs of a past chimney fire include: puffy, gray, honeycomb-textured creosote deposits (rather than the usual shiny black coating); cracked, distorted, or discolored tiles; warped, damaged, or discolored metal components; debris (pieces of liner or creosote) in the firebox; and cracks in the chimney exterior. If you suspect a chimney fire has occurred, stop using the fireplace immediately and schedule a Level 2 inspection before lighting another fire.
Q: Why does smoke come into the room when I open the glass fireplace doors?
A: Opening glass doors when there is a significant fire burning can cause a brief smoke puff into the room because you are suddenly changing the air pressure dynamics inside the firebox. The best practice is to open glass doors slowly and partially at first, allowing the pressure to equalize before opening fully. If significant smoke pours out every time you open the doors regardless of fire size, the fireplace may have a draft problem or the damper may not be fully open.