The Ultimate Guide to Choosing the Best Chimney Brush for Your Stainless Steel Liner
Never use a wire brush on a stainless steel liner. Carbon steel bristles leave iron particles that corrode the liner from the inside and void your warranty. Use polypropylene (poly) bristles for traditional push-pull cleaning, or nylon whips in a rotary drill system for flex liners and tougher Stage 2 creosote.
Size the brush to match your liner’s exact inside diameter. Too small = no cleaning contact. Too large = brush gets permanently stuck. Keep reading for the full breakdown of every variable — bristle, size, shape, rod type, and cleaning method.
- Anatomy of a Stainless Steel Liner
- The 3 Stages of Creosote — and Which Brush Tackles Each
- Why Your Liner Needs a Special Brush
- Polypropylene vs. Nylon: Full Bristle Comparison
- Getting the Size Right: Shape, Diameter & Common Sizes
- Rod Types: Fiberglass vs. Flexible Rods
- Top-Rated Products: Full Reviews
- Side-by-Side Product Comparison
- Essential Safety Gear
- Step-by-Step Cleaning Methods (Top-Down & Bottom-Up)
- Special Considerations for Flexible (Corrugated) Liners
- Troubleshooting: Stuck Brushes, Broken Rods & More
- Preventative Maintenance: Reducing Creosote Buildup
- Chemical Cleaners: What Creosote Logs Can and Can’t Do
- Post-Cleaning Inspection Checklist
- Storing & Maintaining Your Brush and Rods
- Frequently Asked Questions
Understanding Your Chimney: Anatomy of a Stainless Steel Liner
Before you can properly select a brush, it is crucial to understand exactly what a stainless steel liner is and why it functions differently from a traditional clay tile masonry flue. When older masonry chimneys deteriorate, or when a new high-efficiency wood stove is installed, building codes frequently require the installation of a stainless steel liner to bring the chimney up to modern safety standards.
These liners serve three primary purposes:
- Protecting the masonry: Flue gases are highly acidic. The liner prevents those gases from eating away at mortar joints from the inside out, which would eventually allow combustion gases — including carbon monoxide — to escape into your wall cavities and living spaces.
- Providing proper draft: Modern stoves require precisely sized flues to draft correctly. A metal liner reduces the internal volume of an oversized masonry chimney, ensuring smoke is pulled up and out efficiently rather than rolling back into the room.
- Containing chimney fires: In the event of a flue fire, a properly installed, insulated stainless steel liner is designed to contain temperatures exceeding 2000°F and prevent the fire from spreading to the combustible wooden framing of your home.
Rigid vs. Flexible Stainless Steel Liners
Stainless steel liners come in two forms, and this distinction has a direct bearing on which brush and rod system you choose:
- Rigid Liners: Solid straight sections riveted or screwed together. Used in straight chimneys with no offsets or bends. A perfectly smooth interior makes them easier to clean and more draft-efficient. A standard stiff poly brush on rigid fiberglass rods is the ideal tool here.
- Flexible (Corrugated) Liners: Manufactured from a continuously crimped strip of stainless steel. Necessary for chimneys with bends, offsets, or size irregularities. The corrugated interior provides thousands of tiny ridges where creosote can hide — and where stiff brushes can snag. Rotary nylon whip systems are far superior for flex liners.
Grade 316 vs. Grade 304 Stainless Steel
Not all stainless steel liners are made from the same alloy. The two grades you will encounter most often are:
- Grade 304 stainless steel: The standard alloy used in most single-wall liners for wood-burning applications. Excellent corrosion resistance under normal flue conditions. More affordable.
- Grade 316 stainless steel: A marine-grade alloy with added molybdenum, providing superior resistance to chloride corrosion. Required by most building codes and appliance manufacturers for gas appliances, which produce highly acidic condensate. More expensive but significantly longer-lived in demanding environments.
This distinction matters for brush selection because Grade 316 liners are typically used with gas appliances that produce condensing, corrosive flue gases — conditions that make any scratching from improper brushes even more consequential. Always confirm your liner grade and match it to the appliance it serves.
The 3 Stages of Creosote — and Which Brush Tackles Each
Choosing the right brush requires understanding what you are trying to remove. When wood burns, it releases smoke, water vapor, gases, and unburned carbon particles. As these byproducts exit the firebox and encounter the cooler environment of the chimney liner, they condense on the inner surface. This resulting residue is creosote — and it is the primary fuel source for chimney fires.
Flaky Soot
Velvet-like, gray-black dust. Brushes away easily with any poly or nylon brush. Produced by hot, well-oxygenated fires burning dry seasoned wood. The goal is to stay at Stage 1.
Crunchy Tar Flakes
Shiny black “cornflake” deposits. Harder and more adherent than Stage 1. Requires a stiff poly brush or a rotary whip system to break up effectively. Produced by smoldering fires or slightly wet wood.
Glazed Tar
Hard, shiny black tar coating. No standard brush removes it. Attempting to force a brush through Stage 3 glaze can permanently damage your liner or trap the brush. Requires professional chemical treatment and industrial rotary chains.
⛔ Stage 3 Creosote: Do Not Attempt DIY Removal
Stage 3 glazed creosote is one of the most dangerous substances in a residential chimney. It is extremely dense, highly combustible, and impossible to remove with any consumer brush. A professional sweep will typically apply a chemical creosote modifier several weeks before the mechanical cleaning appointment — this product penetrates the glaze and converts it to more brittle Stage 1 material that can then be brushed out. Never attempt to force a brush through Stage 3 glaze; doing so risks permanently warping the liner.
Why Your Stainless Steel Liner Needs a Special Brush
Traditional clay tile flues have been cleaned for centuries with stiff wire brushes. When stainless steel liners became standard, that approach had to change completely. Here is exactly why:
- Scratching and Galvanic Corrosion: When a carbon steel bristle scratches a stainless steel surface, it embeds microscopic iron particles in the scratch. In the damp, acidic environment of a chimney, those particles rust immediately — and that rust accelerates corrosion of the surrounding stainless steel in a process called galvanic corrosion. Over time, this produces pinhole leaks and ultimately structural failure in what is otherwise a very long-lived component.
- Warranty Void: Virtually every major stainless steel liner manufacturer — including DuraVent, Selkirk, and Rockford — explicitly voids the liner warranty if a wire brush is used for cleaning. This is a strong engineering signal: the damage is not theoretical; it is predictable and guaranteed.
- Creosote Adhesion: Scratches create micro-roughness on the liner’s inner surface. Creosote clings to rough surfaces far more aggressively than smooth ones, meaning a scratched liner requires more frequent cleaning — and the cycle of damage compounds over time.
- Even Stainless Steel Wire Brushes Are Risky: Some products are marketed as “stainless steel wire” brushes safe for stainless liners. In practice, the bending and flexing of stainless wire bristles during use generates iron particles through work hardening. The risk profile is similar to carbon steel. Synthetic poly and nylon bristles eliminate this risk category entirely.
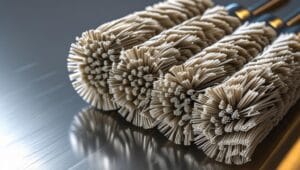
Polypropylene vs. Nylon: Full Bristle Comparison
When shopping for a chimney brush for your stainless steel liner, you will encounter two types of synthetic bristles. Both are safe for stainless steel, but their performance characteristics differ in ways that matter for specific applications.
| Property | Polypropylene (Poly) | Nylon |
|---|---|---|
| Stiffness | Medium-high — aggressive scraping action | Medium — more flexible, less abrasive |
| Best Use | Traditional push-pull rod sweeping, rigid liners | Rotary drill systems, flex liners with offsets |
| Stage 1 Creosote | Excellent ✓ | Excellent ✓ |
| Stage 2 Creosote | Very Good ✓ | Excellent (rotary) ✓ |
| Stage 3 Creosote | Not suitable ✖ | Not suitable ✖ |
| Navigates tight bends? | Limited — stiff in offsets | Excellent — flexes through bends |
| Acid resistance | Excellent | Good |
| High-speed rotary use? | Not recommended — may snap | Ideal — rated for centrifugal force |
| Longevity | Many seasons with proper storage | Whip strings wear faster under rotary use |
Getting the Size Right: Shape, Diameter & Common Sizes
Brush sizing is the dimension that causes the most DIY failures. An improperly sized brush is either useless or becomes a catastrophic problem requiring professional extraction. Getting it right costs you nothing but two minutes of measurement.
Matching Shape to Your Flue
Stainless steel liners are almost exclusively round or oval. You must buy a brush that matches the shape of your liner exactly. A square brush in a round liner will dig its corners in and fail to clean the curved walls between those corners. Always verify whether your liner is round or oval before purchasing — oval liners are most common in older homes where a rectangular masonry flue was lined.
Correct Size
Matches the inside diameter exactly. Makes full contact with liner walls. Cleans thoroughly without resistance.
Too Small
Slides past creosote without friction. No cleaning contact with walls. Completely ineffective. Passes through freely.
Too Large (1″+ over)
Forces bristles hard against walls. Extremely difficult to push. Risks permanent entrapment requiring professional extraction.
How to Measure
Check the stove/insert documentation, find the data tag on the liner collar, or measure the inside diameter with a tape measure at the clean-out or smoke pipe connection.
Common Liner Sizes and Corresponding Brush Sizes
| Appliance Type | Typical Liner Diameter | Brush Size Needed | Rod Type |
|---|---|---|---|
| Small wood stove (<60,000 BTU) | 5 inches | 5″ round poly | Rigid fiberglass |
| Standard wood stove | 6 inches | 6″ round poly | Rigid fiberglass |
| Large wood stove / insert | 7–8 inches | 7″ or 8″ round poly | Rigid or flexible fiberglass |
| Fireplace with liner | 8–10 inches | 8″–10″ round poly | Rigid fiberglass |
| Gas appliance (flex liner) | 4–6 inches | Rotary whip (self-sizing 5–9″) | Flexible drill rods |
| Oval liner (older homes) | Measure both axes | Matching oval poly brush | Rigid fiberglass |
Rod Types: Fiberglass vs. Flexible Rods
The rods that extend your brush up the chimney are almost as important as the brush itself. The wrong rod system will either make cleaning far more difficult than it needs to be, or it will fail structurally mid-job — leaving the brush stranded inside the flue.
| Rod Type | Best For | Connection | Weakness |
|---|---|---|---|
| Rigid Fiberglass Rods | Straight rigid liners, top-down cleaning | Screw-together (¼” NPT or ⅜”) | Cannot navigate bends; snap if overtorqued |
| Flexible Fiberglass Rods | Flex liners, chimneys with offsets, bottom-up | Screw-together or button-lock | Less rigid push force; can coil under pressure |
| Button-Lock Flexible Rods | Budget kits, occasional use | Push-button snap fit | Less secure than screw-together; can disengage |
| Drill-Attachment Flexible Rods | Rotary cleaning systems | Power drill chuck attachment | Require a cordless drill; strings wear over time |
⚠️ Rod Connection Critical Caution
When using screw-together fiberglass rods, always spin them clockwise to assemble and push them down the chimney. Pulling up while spinning counter-clockwise will unscrew the joint, leaving the lower section (with your brush) trapped inside the liner with no connection point to retrieve it. This is one of the most common stuck-brush scenarios in DIY chimney cleaning.
Top-Rated Chimney Brushes for Stainless Steel Liners
After analyzing hundreds of verified installer and homeowner reviews, we selected the three best chimney brush options for stainless steel liners — covering every cleaning scenario from the straightforward annual sweep to the demanding flex-liner clean.
1. Best Overall: Seal-Tite 6-Inch Round Poly Chimney Brush

For reliable, straightforward annual cleaning of a standard residential wood stove liner, the Seal-Tite 6-Inch Round Poly Chimney Brush is the gold standard recommendation. Specifically designed for insulated and non-insulated stainless steel liners, it has earned its reputation among DIY homeowners through consistent real-world performance over many seasons of use. The polypropylene bristles are dense enough to scrape Stage 1 and moderate Stage 2 creosote from the liner walls without any risk of scratching or galvanic corrosion, and they resist the acidic creosote chemistry that would degrade lesser materials.
The brush core is solid and well-constructed, maintaining its circular profile under push-pull load rather than collapsing asymmetrically the way cheap brush cores tend to. The ¼-inch NPT standard threaded connection means it is compatible with virtually every brand of rigid fiberglass extension rod on the market, so you are not locked into proprietary rod systems. This is a brush-only product — rods are sold separately — which is actually advantageous if you want to select your preferred rod system independently.
✓ Pros
- Durable polypropylene bristles resist acid and hold shape
- Sturdy core for effective push-pull cleaning
- Safe for all stainless steel liners — preserves warranty
- Compatible with all standard ¼” NPT rods
- Excellent value — lasts multiple seasons with proper care
✗ Cons
- Rods must be purchased separately
- Too stiff for liners with severe offset bends
- Only covers one specific diameter — buy exact size
2. Best Rotary Cleaning Kit: Gardus RCH205-B SootEater

If you have a corrugated flexible liner, a chimney with 45 or 90-degree offsets, or simply want to clean from the bottom up without ever setting foot on the roof, the Gardus SootEater Rotary System is in a category of its own. This drill-powered system uses nylon whip strings that spin at high speed via centrifugal force, automatically expanding to fill the liner diameter and reaching into every corrugation — something a push-pull brush can never fully accomplish in a flex liner.
The SootEater’s biggest practical advantage is its self-sizing capability: the spinning whips expand to fit any liner between 5 and 9 inches in diameter, eliminating the need to own multiple sized brushes. The flexible rods navigate 45 and even 90-degree bends with ease, making it genuinely effective for even the most awkward chimney geometry. The included rod set extends to 18 feet for a full-height clean from below. The system works with any standard cordless drill — use a mid-range 18V–20V drill on medium speed, never a high-torque corded drill, which can snap the rods.
✓ Pros
- Bottom-up cleaning — eliminates roof risk entirely
- Self-sizing: fits liners 5″–9″ without buying multiple brushes
- Centrifugal nylon whips reach corrugations in flex liners
- Flexible rods navigate 45° and 90° offsets with ease
- Includes 18 feet of rod extensions out of the box
- Highly effective on tough Stage 2 buildup
✗ Cons
- Requires a cordless drill (sold separately)
- Nylon whip strings wear out with heavy use
- Slightly more complex setup than a simple brush-and-rod kit
3. Best All-in-One Budget Kit: Holikme 30 Feet Chimney Sweep Kit

For homeowners who want everything in one box at a budget-friendly price, the Holikme 30-Foot Chimney Sweep Kit delivers genuine value. The kit includes a nylon brush head, 30 feet of flexible extension rods, and drill adapters — everything needed for a complete DIY clean without sourcing separate components. The flexible rods work well for liners with minor offsets or bends, and the system can be used either manually (by hand) or powered by a cordless drill for more aggressive cleaning action.
The button-lock rod connection mechanism is the design compromise that keeps this kit’s price low. It is convenient and fast to assemble, but it is not as secure or rigid as premium screw-together fiberglass rod systems. For annual cleaning of a standard liner with light-to-moderate Stage 1–2 buildup, it performs well. For chimneys with significant bends, heavy creosote, or where you will be using the kit many times per season, the upgrade to a dedicated brush and premium rod set is worth the additional investment.
✓ Pros
- Complete out-of-the-box kit — brush, 30 feet of rods, drill adapters
- Flexible rods handle minor offsets and bends
- Quick button-lock assembly — no threading required
- Works manually or with a cordless drill
- Excellent price for occasional users
✗ Cons
- Button-lock less secure than screw-together rods under load
- Brush head less dense than standalone professional brushes
- Not ideal for heavy commercial-frequency use
Side-by-Side Product Comparison
| Feature | Seal-Tite Poly Brush | Gardus SootEater | Holikme 30-Ft Kit |
|---|---|---|---|
| Best For | Rigid liners, straight chimneys | Flex liners, offsets, roof-free | Budget, occasional use |
| Bristle Type | Polypropylene | Nylon whip strings | Nylon |
| Complete Kit? | Brush only | Yes — rods included | Yes — 30ft rods included |
| Requires Drill? | No | Yes | Optional |
| Self-Sizing? | No — buy exact size | Yes — fits 5″–9″ | No |
| Navigates Offsets? | Limited | Yes — 45° and 90° | Minor bends only |
| Roof-Free Option? | No — top-down only | Yes — bottom-up | Yes |
| Stage 2 Performance | Very Good | Excellent | Good |
Essential Safety Gear for DIY Chimney Sweeping
Chimney sweeping is inherently messy and carries specific health and safety risks. The gear required is not expensive, but skipping any item creates genuine hazard exposure.
- N95 or P100 Respirator Mask: Creosote dust is toxic. Fine soot particles contain polycyclic aromatic hydrocarbons (PAHs) — known carcinogens with documented long-term respiratory health consequences at chronic exposure levels. A cloth mask or dust mask is completely insufficient. You need a properly fitted N95 at minimum; a P100 half-face respirator is better for heavy cleaning sessions.
- Safety Goggles (Sealed): When cleaning from below, soot falls directly toward your face. Regular safety glasses with open sides allow fine particles to reach the eyes. Use goggles that seal around the eye socket. Creosote particles cause significant chemical irritation on mucous membranes.
- Heavy-Duty Gloves: Polypropylene bristles have sharp ends that can puncture skin. Fiberglass rods, especially aged or damaged ones, can shed glass splinters that embed in skin invisibly. Wear thick leather or heavy nitrile-coated work gloves for the entire job.
- Disposable Coveralls or Old Clothing: Creosote stains are essentially permanent on fabric. Wear clothing you do not mind discarding, or invest in disposable coveralls for the cleaning session.
- Roof Safety Harness (Top-Down Only): Falls from residential roofs are the leading cause of serious injury in DIY home maintenance. If you must access the roof, use a certified safety harness anchored to a ridge anchor or a strap-style chimney anchor. This is the primary reason bottom-up rotary systems have become so popular — they eliminate the roof-access risk entirely.
✅ Prepare the Room Before Any Soot Falls
Before inserting any brush into the flue, protect your home interior. Move rugs and furniture away from the hearth area. Spread a canvas drop cloth (not plastic — it tears) over the floor and hearth surface. Use heavy poly sheeting and painter’s tape to completely seal the stove door or fireplace opening. Any gap in the seal will result in fine soot escaping into the room on the pressure pulse of each brush stroke. Take the time to seal it completely — it takes five minutes and saves hours of cleanup.
Step-by-Step: Both Cleaning Methods in Full
Method 1: Traditional Top-Down Clean (Poly Brush + Rigid Rods)
This method is ideal for straight rigid liners. It requires safe roof access.
-
Prepare and Seal the Firebox Remove all grates, decorative logs, and accessories from the firebox or stove. Lay a canvas drop cloth over the hearth. Use thick plastic sheeting and painter’s tape to completely seal the firebox opening or stove door. Press the tape firmly along every edge — any gap will allow soot to billow into the room on each brush stroke.
-
Set Up Roof Access Safely Position your ladder on stable, level ground extending at least 3 feet above the roofline. Secure your safety harness before stepping onto the roof. Carry your assembled first brush-and-rod section up with you. Do not carry loose rods — pass them up via a rope or have a partner hand them to you.
-
Remove and Inspect the Chimney Cap Using a screwdriver or wrench, remove the chimney cap and spark arrestor. Set it safely aside — not loose on the roof where it can slide. Inspect the cap screen for blockages: bird nests, leaf debris, and creosote accumulation on the screen are all common. Clean or replace a blocked cap before reinstalling.
-
Insert and Scrub the First Section Thread the poly brush on the first rod. Lower it into the liner and plunge vigorously up and down through the top 3–4 feet of liner. Use full-length strokes — short strokes miss sections and leave creosote deposits. You should feel resistance as the brush contacts the liner walls; if you feel none, your brush may be too small.
-
Add Rods and Work Down the Full Flue Once the first section is thoroughly scrubbed, screw on the next rod — always clockwise. Push the brush section further down, continuing the vigorous up-and-down motion. Add one rod at a time until you feel the brush contact the smoke shelf or the top of the stove connector. Never count on feeling the bottom — add all rods based on your known liner length.
-
Retrieve, Reinstall, and Wait Pull the brush back up slowly, removing each rod as it clears the chimney top. Reinstall the chimney cap and descend safely. Once inside, wait a minimum of 15–20 minutes for all dislodged soot to settle fully behind the sealed plastic sheeting before removing it.
-
Remove the Seal and Vacuum the Firebox Carefully peel the plastic seal from the firebox opening — do this slowly and from the bottom upward to fold it closed, trapping the soot inside the plastic. Use a HEPA-filtered ash vacuum (not a standard shop vac) to collect all dislodged creosote from the firebox floor. Dispose of the creosote in a sealed metal container outdoors.
Method 2: Bottom-Up Rotary Clean (Drill + SootEater)
This method keeps you off the roof entirely and is the recommended approach for flex liners.
-
Prepare and Seal with a Rod Slit Seal the firebox opening with plastic sheeting exactly as above, but cut a small 1-inch slit at the center of the plastic. This is the portal through which you will thread the rods. Keep the slit as small as possible — you want it to grip loosely around the rod, minimizing soot escape.
-
Assemble the Rotary Whip on the First Rod Thread the rotary nylon whip head onto the first flexible rod. Insert it through the slit in the plastic and into the flue opening, pointing upward. Do not force — the rods should feed into the liner flue with moderate resistance.
-
Attach Your Cordless Drill Secure the tail end of the rod in your cordless drill chuck. Use a mid-range voltage cordless drill (18V–20V) set to medium speed. Never use a high-torque corded drill — the excess torque will snap the flexible rods. The drill will spin the rods and whip clockwise.
-
Spin and Feed Upward Start the drill at medium speed. While it spins, slowly feed the rod upward through the slit into the liner. The centrifugal force of the spinning whips expands them to contact the full liner circumference. Advance slowly — roughly 6 inches of progress every 10–15 seconds — to give the whips time to clean each section.
-
Add Extension Rods as Needed When the first rod is nearly fully inserted, stop the drill. Disconnect the drill, screw on the next extension rod clockwise, reattach the drill, and resume spinning upward. Continue until you reach the full length of your liner.
-
Reverse, Remove, and Clean Up To retrieve the rods, spin continuously while slowly pulling downward. Do not stop spinning and pull — this can wrap loose creosote around the rods. Remove rods one at a time from the drill end. Once fully retrieved, wait 20 minutes for soot to settle, then vacuum the firebox as described above.
Special Considerations for Flexible (Corrugated) Liners
Flexible liners present unique challenges that require specific technique adjustments beyond simply choosing the right brush. Their corrugated interior traps significantly more creosote than a smooth rigid liner, and their geometry can cause brushes to catch if not handled carefully.
- Always use a rotary system: A push-pull poly brush on a flex liner achieves only partial contact with the corrugated surface. The rotary whip’s centrifugal expansion allows it to reach into each corrugation groove in a way that radial bristles cannot. For flex liners, the Gardus SootEater or equivalent rotary system is not just a preference — it is the only effective cleaning method.
- Never pull a rigid brush through a flex liner: A rigid brush in a corrugated liner is likely to catch on the corrugations under upward pull force, particularly if there is any buildup in the ridges. Always use flexible drill rods that can bend with the liner’s corrugation rather than fighting against it.
- Account for the corrugation in frequency: Flex liners accumulate creosote faster than rigid liners due to the increased surface area and turbulence at each corrugation. If your appliance manufacturer recommends annual cleaning for a rigid liner, expect to clean a flex liner on the same stove every 6–9 months under similar burning conditions.
- Inspect for separation at the joints: Unlike rigid liners where sections are mechanically fastened, flex liners can develop loose or separated section joints over time, particularly with gas appliances where thermal cycling is constant. During your annual inspection, check that the liner appears continuous — gaps or separations are a serious flue gas leak hazard that requires professional repair.
Troubleshooting: Common DIY Sweeping Issues
What If the Brush Gets Stuck?
If your poly brush becomes wedged in the liner, do not panic and do not yank violently. A violent yank will either break the rods — leaving the brush stranded inside with no retrieval connection — or damage the liner. Here is the correct procedure:
- Stop all movement and assess. Is this the brush catching on a corrugation, a buildup patch, or a bend?
- For screw-together rod systems: try gentle upward pressure combined with a very slight clockwise rotation. Do not rotate counter-clockwise — that unscrews the joints.
- For button-lock systems: try gentle upward pressure while slightly compressing the rod below the snag point.
- If the brush moves slightly but re-catches in the same spot: you may be at a heavy Stage 2 or 3 deposit. Do not force through it. Apply a chemical creosote modifier and wait several days before reattempting.
- If the brush is truly immovable: stop. Call a certified CSIA sweep. They carry flexible camera systems and specialized retrieval tools that can extract a stuck brush without damaging the liner.
What If a Rod Breaks?
Rod fractures are most common with aged fiberglass rods that have been stored improperly (bent or kinked in storage) or used at excessively high torque. If a rod snaps during a top-down clean, try inserting a fresh rod set from the firebox below and pushing the broken section up and out through the top. If this fails, a professional sweep is required. To prevent this: inspect rods before every use for any visible stress cracks or kinking, and replace rods that have visible damage. Store them straight — not coiled or bent.
What If Suction Seems Fine but Channels Keep Reappearing?
If you clean the liner and find that the same sections show heavy re-accumulation within weeks, you likely have a persistent source of excess creosote production: smoldering fires, wet wood, or a flue that is too large and runs too cool. Address the root cause rather than cleaning more frequently. See the Preventative Maintenance section below.
Preventative Maintenance: How to Reduce Creosote Buildup
The most effective chimney cleaning is the one you rarely need. Your burning habits are the primary variable controlling how fast creosote accumulates in your stainless steel liner.
| Habit | Impact on Chimney Liner | Recommendation |
|---|---|---|
| Wood Moisture Content | Burning wet or unseasoned wood (above 20% moisture) creates excessive steam, cooling flue gases rapidly and causing heavy, sticky creosote condensation throughout the liner. | Only burn wood seasoned for at least 6–12 months. Use a digital moisture meter to verify below 20% before every burn. Kiln-dried wood (below 15%) produces the cleanest combustion. |
| Fire Temperature | Smoldering fires produce heavy, cool smoke loaded with unburned particles. These particles condense rapidly on the liner wall, forming thick Stage 2 deposits within weeks. | Burn hot, oxygen-rich fires. Ensure the damper is open fully during lighting and never restrict air supply below the manufacturer’s minimum setting for overnight burns. |
| Wood Type | Softwoods (pine, fir, spruce) have higher resin content and burn faster. Hardwoods (oak, ash, maple, hickory) burn slower, hotter, and produce less particulate per BTU. | Prioritize dry hardwoods. In a pinch, dry softwood is preferable to wet hardwood — moisture content always outweighs wood species as a creosote variable. |
| Flue Temperature | A cold chimney on a cold day condenses combustion gases faster, regardless of burning habits. A flue below 250°F is a creosote-generating environment. | Pre-warm the flue on cold days by burning a small, hot kindling fire for 10–15 minutes before loading the main fuel. This raises the liner temperature above the condensation threshold before heavy smoke is produced. |
| Liner Sizing | An oversized liner cannot maintain sufficient draft velocity, allowing gases to cool and stall inside the flue instead of exiting quickly. A 6″ liner serving a stove sized for 6″ will always outperform an 8″ liner on the same stove. | Confirm your liner diameter matches the appliance manufacturer’s specified flue collar size. If your liner is larger, consult a professional about an insulated flex liner insert of the correct diameter. |
Chemical Cleaners: What Creosote Logs Can and Can’t Do
Creosote sweeping logs and chemical powder treatments are widely available and often used by homeowners as an alternative to physical cleaning. Understanding their actual mechanism — and their genuine limitations — is essential for safe chimney maintenance.
How they work: These products release chemical compounds (typically salts of zinc, magnesium, or ammonium) when burned that travel up the flue and bond to creosote deposits. These compounds alter the chemistry of the creosote, drying it out and converting sticky Stage 2 or glazed Stage 3 material into brittle, flaky Stage 1 soot. This makes the subsequent physical brush cleaning far easier and more effective.
What they cannot do: They cannot physically remove creosote. After treatment, the converted material remains inside the liner. It is now in a form that a brush can remove — but without that brushing, the converted creosote accumulates in the flue and can still ignite. Chemical logs are a pre-treatment before brushing, not a substitute for brushing.
The CSIA Standard: Annual Inspection Is Non-Negotiable
The Chimney Safety Institute of America mandates that chimneys, fireplaces, and venting systems be inspected at least once annually by a qualified professional, and cleaned as needed. For wood-burning appliances connected to stainless steel liners, this typically means annual mechanical cleaning to remove flammable creosote buildup. Critically, an annual inspection also allows a qualified sweep to examine the structural integrity of the liner itself — checking for buckling, tears, separated joints, and connector integrity that are impossible to assess from the firebox without a camera. A clean liner that is structurally compromised is as dangerous as a dirty one.
Post-Cleaning Inspection Checklist
After every cleaning, perform this quick inspection before returning the appliance to service. A clean liner is an opportunity to catch developing issues before they become serious hazards.
- Vacuum all loose creosote from the firebox floor and smoke shelf — do not leave it in the firebox where it can be aspirated back into the liner during the next fire
- Inspect the chimney cap screen for accumulated debris, rust, or damage — replace if the screen is more than 50% blocked or visibly corroded
- Check the liner connection at the stove collar for any gaps, looseness, or soot staining that might indicate a leak in the connection joint
- Visually inspect the top of the liner from the roof (if accessible) for visible deformation, buckling, or damage to the exposed section above the crown
- Check the smoke shelf and damper for buildup — these areas are not reached by the liner brush and accumulate their own creosote deposits
- Inspect the firebox floor and walls for any cracks in the refractory mortar that were previously hidden by creosote
- Test the damper for full and free operation — a damper that binds or sticks may indicate a warped liner section above it
- Note the approximate volume of removed creosote — a significant increase over the previous season indicates a change in burning habits worth investigating
Storing and Maintaining Your Brush and Rods
Proper storage of your brush and rod system directly affects how long they last and how well they perform. A brush that is stored incorrectly will be ineffective or structurally compromised by the next cleaning season.
- Clean the brush after every use: Tap the brush firmly against the inside of a metal trash can to dislodge accumulated creosote. Brush-to-brush contact will spread creosote between bristles, reducing effective stiffness. Allow the brush to dry completely before storing — creosote moisture retention will degrade the polypropylene bristles over time.
- Inspect bristles annually: Look for bristle loss (bare patches on the brush face), significant deformation of the bristle spread, or brittleness in the bristle material. A brush that has lost more than 20% of its bristles will not clean effectively. Replace it.
- Store rods completely straight: Fiberglass rods develop a permanent memory set if stored coiled or bent. A rod with a memory bend will not travel straight in the liner, reducing cleaning contact and increasing the risk of snapping. Hang them vertically or store them flat in the original tube packaging.
- Inspect rod threads before every use: Cross-threaded or stripped rod connections are a frequent cause of rod separation inside the liner. Run the male thread against the female thread by hand before every installation to confirm the joint seats cleanly.
- For rotary nylon whips: Inspect the nylon strings for wear, fraying, or significant shortening after every use. Worn whip strings lose centrifugal reach and stop making effective wall contact. Replace the whip head when strings are visibly shortened or show significant fraying.
Frequently Asked Questions
How often should I clean my stainless steel chimney liner?
The standard guideline is to inspect annually and clean whenever creosote buildup reaches 1/8 inch or more. For homeowners who heat primarily with wood throughout the colder months, cleaning midway through the heating season and again at the season’s end is advisable — particularly if burning habits include any overnight slow burns. For light users who burn 1–2 fires per week, annual cleaning at the end of the season is generally sufficient.
Can I use a chimney cleaning log instead of brushing?
No. Chimney cleaning logs are chemical pre-treatments, not cleaning tools. They convert stubborn creosote into a more brittle, friable form — but the converted material remains in your liner until physically removed with a brush. Using a sweeping log without following up with mechanical cleaning simply changes the form of the hazard, not the quantity. Use sweeping logs as a supplement to brushing in heavy-buildup situations, not as a replacement for it.
What are the dangers of not cleaning my chimney liner?
The primary risk is a chimney fire. Ignited creosote burns at temperatures exceeding 2000°F — far beyond what wood fires generate — creating a roaring internal fire that sounds like a jet engine. A stainless steel liner is designed to contain this event under normal conditions, but prolonged chimney fires warp the metal, destroy insulation jackets, and eventually allow heat and flames to reach the surrounding masonry and wooden framing. Secondary risks include carbon monoxide accumulation from a partially blocked liner, and gradual liner corrosion from acidic deposits allowed to sit over multiple heating seasons.
Can I use a stainless steel wire brush on a stainless steel liner?
No — even though both materials are stainless steel, the answer is still no. Stainless steel wire bristles undergo work hardening during the flexing of a cleaning stroke, generating iron-rich particles that behave like carbon steel contamination on the liner surface. Additionally, stainless steel wire bristles are harder than the thin sheet metal of the liner walls and will leave scratches that accelerate creosote adhesion and provide initiation sites for corrosion. There is no wire bristle type — stainless or carbon — that is safe for stainless steel liner cleaning. Only polypropylene and nylon bristles are appropriate.
Do I need to hire a professional or can I DIY?
DIY cleaning is a genuinely achievable task for a capable homeowner with the right tools — if you have a straight rigid liner, safe roof access, and Stage 1–2 creosote. You should hire a CSIA-certified professional sweep if: your roof is dangerously steep or unstable, you have a flex liner with complex geometry, you detect any Stage 3 glaze, you hear unusual sounds from the chimney (indicating wildlife obstruction or structural loose material), or your liner has not had a professional camera inspection within the last several years to verify structural integrity.
Why does my brush keep losing bristles?
Rapid bristle loss is typically caused by one of three things: using an oversized brush that is under extreme compression during use, forcing a brush through glazed Stage 3 creosote deposits that shear bristles mechanically, or using a low-quality brush whose bristles are not securely anchored to the core. Always size correctly, never force through heavy glaze, and buy from established brands with documented track records for bristle retention.
Can I clean my chimney liner the same day I sweep the firebox?
Yes — in fact, doing both on the same day is the most efficient approach. Clean the liner first (top-down or bottom-up), allow soot to settle for 20 minutes, then vacuum the firebox. This sequence ensures that any soot dislodged from the liner above settles into the firebox before you vacuum it, rather than requiring two separate cleanup passes. Inspect the smoke shelf and damper after vacuuming — these areas accumulate their own deposits that the liner brush does not reach.
Conclusion: A Clean Liner for a Safe and Warm Home
Choosing the best chimney brush for your stainless steel liner comes down to three decisions: selecting synthetic bristles (polypropylene for push-pull, nylon for rotary), sizing the brush to match your liner’s exact inside diameter, and choosing the cleaning method that matches your chimney’s geometry and your comfort level with roof access.
The three products recommended in this guide cover the full spectrum of residential cleaning scenarios. Pair any of them with good burning habits — dry seasoned wood, hot oxygen-rich fires, and appropriately sized liner for your appliance — and your stainless steel liner will remain clean, efficient, and structurally sound for the full span of its designed lifespan.
When in doubt about stage of creosote, liner condition, or anything structural, the investment in a professional CSIA-certified sweep pays for itself in prevented damage and genuine peace of mind. A clean chimney is a safe chimney — and getting that right is always worth the effort.