The Definitive Guide to Chimney Mortar
Using the correct mortar for your chimney isn’t just about repairs — it’s about fire safety, structural integrity, and protecting your home for decades to come. This expert guide explains exactly what you need to know before you mix a single batch.
Inside the firebox or between flue liners: Use refractory mortar (rated to 2000°F+). Standard mortar will crack and fail under direct heat, creating a carbon monoxide and fire hazard.
External brickwork, crown, and chimney stack:Use Type N masonry mortar for most repairs, or Type S in high-wind or seismic areas. Never use refractory mortar outside — it degrades rapidly in weather exposure.
For a full breakdown of which product to buy, how to assess your damage level, and the complete DIY repair process, keep reading.
- Find the Right Mortar Instantly (Interactive Tool)
- Why Chimney Mortar Choice is a Safety Issue
- Understanding the Science: Mortar Types Explained
- The Full Mortar Grade Spectrum: O, K, N, S, M
- Damage Assessment: When Is DIY Appropriate?
- Product Recommendations
- Step-by-Step Repointing Guide
- Chimney Crown Repair & Waterproofing
- Flue Liner Repair: What You Need to Know
- Historic Chimney Mortar: The Old House Special Case
- Tools & Materials Checklist
- Mixing and Consistency Guide
- Curing Times, Weather Windows & Common Mistakes
- Frequently Asked Questions
⛔ CRITICAL WARNING: This is a Safety-Critical Repair
This guide covers minor DIY repairs such as repointing a few deteriorated mortar joints on the exterior chimney stack. Using the wrong type of mortar can create a serious fire hazard or cause deadly flue gas leaks — including carbon monoxide — into your home. If your chimney has large cracks, is leaning, shows structural damage at the base, or has compromised flue liner sections, STOP and call a CSIA-certified professional mason immediately. No tutorial replaces a professional assessment for structural or fire-safety concerns.
Find the Right Mortar Type Instantly
Where on the chimney are you making repairs?
✅ Recommendation: Use Refractory Mortar
Reason: You need a specialized high-temperature cement that withstands direct contact with flames and extreme heat (up to 2000°F / 1093°C). Regular masonry mortar will crack, fail, and create a severe carbon monoxide and fire hazard. Scroll down for our recommended refractory product and full firebox repair instructions.
✅ Recommendation: Use Type N or Type S Masonry Mortar
Reason: For the chimney’s exterior structure, you need a mortar that can withstand the elements and match the strength of the original construction. Never use refractory mortar on the exterior — it is not designed for weather exposure and will deteriorate. Scroll down for recommended masonry products and the full repointing guide.
Why Chimney Mortar Choice Is a Safety Issue
Most homeowners think of mortar as a purely structural material — the “glue” that holds bricks together. In most parts of a house, that’s accurate. In a chimney, it’s a dangerous oversimplification. The chimney is a multi-environment structure that spans a temperature range of hundreds of degrees Fahrenheit within a few feet of vertical distance, is simultaneously exposed to rain, ice, UV radiation, and thermal cycling on the outside, and must contain combustion gases — including carbon monoxide — on the inside. No single mortar formulation can perform safely across all of these conditions simultaneously.
The stakes of getting this wrong are severe. A failed refractory joint inside the firebox or between flue liner sections is not just a structural problem — it is a gap through which combustion gases, superheated air, and potentially open flames can escape into the surrounding masonry, wall cavities, and wooden framing. This is the mechanism behind the majority of house fires that originate in the chimney. Carbon monoxide can seep through even hairline cracks in deteriorated mortar, accumulating in living spaces silently and fatally.
Understanding the Science: Why Mortar Types Aren’t Interchangeable
It’s a common but dangerous misconception that “mortar is mortar.” Each type is engineered at the chemical level for a specific performance envelope. Using the wrong one isn’t just ineffective — it will actively fail in ways that are difficult to predict and potentially dangerous to diagnose after the fact.
1. Refractory Mortar (High-Heat Areas)
Refractory mortar is your non-negotiable choice for any part of the chimney that comes into direct contact with high heat or flames. This includes the walls and floor of the firebox, the joints between clay flue liner sections, and any area inside the smoke chamber above the firebox.
- Composition: Unlike regular mortar, refractory mortar is made from calcium aluminate cement — not Portland cement — combined with aggregates such as fireclay, silica, and alumina. This chemistry is fundamentally different from masonry mortar and is specifically engineered to gain strength rather than deteriorate as temperatures rise.
- Thermal performance: Standard Portland cement-based mortars begin to lose structural integrity above approximately 300°F. A wood fire in a firebox can reach 900–1100°F at the firebox walls, and a chimney fire can exceed 2100°F. Refractory mortar is rated to remain structurally intact and gas-tight throughout this range.
- Gas-tightness: Beyond holding firebricks together, properly applied refractory mortar creates a gas-tight seal that prevents fire, smoke, and carbon monoxide from escaping the flue and entering the surrounding masonry or living spaces.
- Curing process: Most refractory mortars require a controlled first-fire curing process — a series of progressively larger fires over several days that allow the mortar to cure fully under heat rather than at room temperature. Follow the manufacturer’s curing protocol precisely.
⚠️ Never Use Refractory Mortar on Exterior Masonry
Refractory mortar is engineered for a high-heat, relatively dry environment. It is not formulated to resist freeze-thaw cycling, prolonged moisture exposure, or UV radiation. Applied to exterior brickwork, it will absorb water, crack during the first winter freeze, and fail rapidly — potentially destabilizing the joints you intended to repair. Keep it inside the firebox and flue where it belongs.
2. Masonry Mortar (Exterior Structure)
This is the structural “glue” that holds the visible brickwork of your chimney together. It is made from a mixture of Portland cement, hydrated lime, and sand in varying ratios. The ratio of these ingredients determines its mechanical properties — specifically its compressive strength, flexibility, and permeability — leading to the standardized “Type” classification system.
The Full Mortar Grade Spectrum: Types O, K, N, S, and M
The ASTM standard mortar type classification system provides a framework for understanding the full range of masonry mortars available, from the softest and most flexible to the hardest and most rigid. For chimney work, you will almost always be working with Types N and S — but understanding the full spectrum helps you make an informed decision, especially if you are working on an older or historic chimney.
| Type | Compressive Strength | Portland:Lime:Sand | Flexibility | Chimney Use |
|---|---|---|---|---|
| Type K | 75 psi | 1 : 3 : 10.5 | Very High | Historic only |
| Type O | 350 psi | 1 : 2 : 9 | High | Pre-1930s brick |
| Type N | 750 psi | 1 : 1 : 6 | Medium-High | Standard exterior ✓ |
| Type S | 1800 psi | 2 : 0.5 : 4.5 | Medium | High-wind / seismic ✓ |
| Type M | 2500 psi | 3 : 0.25 : 12 | Low | Too rigid for chimneys ✖ |
| Refractory | Varies (heat-rated) | Calcium aluminate + fireclay | N/A | Firebox & flue only ✓ |
Why Type M Is Wrong for Chimneys
A common mistake among homeowners who “want the strongest thing available” is reaching for Type M mortar for chimney repairs. Type M is formulated for high compressive load applications like foundation walls and retaining walls — situations where structural rigidity is the primary concern and flexibility is not needed. A chimney, by contrast, undergoes constant thermal cycling: it heats up significantly every time you light a fire and cools back to ambient temperature afterward. This repeated expansion and contraction requires a mortar with enough flexibility to absorb the movement without cracking. Type M’s extreme rigidity means it will crack before the bricks do, and those cracks will allow water infiltration that accelerates further deterioration. Never use Type M for chimney repairs.
The Role of Lime in Mortar
The hydrated lime component of masonry mortar serves several purposes that are particularly important in chimney applications. Lime improves workability (making the wet mortar easier to apply into joints), enhances adhesion to the brick faces, reduces water retention that could lead to freeze-thaw damage, and provides a degree of self-healing: lime mortar can “recrystallize” into fine cracks over time under the right conditions, a property called autogenous healing that helps the repair resist water infiltration longer. Higher-lime mortars like Type N are therefore better suited for above-grade masonry like chimneys than lower-lime mortars like Type S or M, except in the specific situations where additional strength is necessary.
Damage Assessment: When Is DIY Appropriate?
Before purchasing a single bag of mortar, an honest assessment of the damage you are dealing with is the most important step in this entire process. Chimney repairs span a wide spectrum from completely safe DIY work to structural issues that demand a licensed professional. Making the wrong call costs far more than hiring a professional from the outset.
Signs You Can DIY
Surface Erosion
Mortar joints recessed 3/8″–3/4″ but otherwise intact. Bricks are solid and undamaged. Classic candidate for standard repointing.
Isolated Loose Bricks
One or two bricks slightly loose with deteriorated surrounding joints. Can be reset with fresh mortar if bricks themselves are undamaged.
Minor Firebox Joint Cracks
Hairline cracks between firebricks inside the firebox. Appropriate for refractory mortar patch if structural integrity is sound.
Crown Surface Cracking
Surface cracks in the chimney crown (the concrete cap) without deep penetration or crumbling. Can be repaired with crown repair sealant.
Stop — Call a Professional
🚨 These Conditions Require a Certified Mason
- Any visible lean, tilt, or settlement of the chimney structure — this indicates foundation or base-level structural failure
- Large sections of missing mortar where bricks can be rocked by hand — the structure has lost its composite integrity
- Spalling bricks (bricks that are flaking, delaminating, or crumbling) — the brick itself has failed, and mortar alone cannot fix this
- Cracks in the flue liner that are visible through the firebox opening, or confirmed by camera inspection — a cracked liner is a direct path for combustion gases into wall cavities
- Water staining inside the firebox or at ceiling/wall junctions near the chimney — indicates a breach in the flue system
- Smoke entering the room when the fire is burning — a draft problem may indicate a structural flue obstruction or liner issue
- A chimney fire has occurred — even a minor one. Flue liner tiles can crack and separate in ways invisible from below but confirmed only by camera inspection
Product Recommendations
For Firebox & Flue Liners: High-Heat Refractory

RUTLAND Refractory Cement
This pre-mixed, ready-to-use refractory cement is the go-to choice for DIY repairs inside the firebox, including filling cracked joints between firebricks, patching gaps between the firebox floor and walls, and sealing the first few joints of the flue liner above the smoke shelf. Rated to 2000°F, it applies like a stiff putty, conforms to irregular surfaces, and cures rock-hard to create a permanent, smoke-tight bond. No mixing required — open the tub and apply with a pointing trowel or a stiff-bristle brush for smaller gaps. Follow the manufacturer’s first-fire curing protocol before operating a full fire.
View on AmazonFor Exterior Brick Repointing: Type N Masonry

Quikrete Type N Mortar Mix
For most general chimney exterior repointing, Quikrete’s Type N mortar is a reliable, widely available choice. It’s a pre-blended mix of masonry cement and sand, ensuring a consistent proportioned mixture every time — eliminating the risk of getting your Portland-to-lime-to-sand ratio wrong when mixing from scratch. Add water gradually, mix to a stiff peanut-butter-like consistency, and the mortar is ready for application. Type N is the correct choice for above-grade chimney brickwork in most climates, offering the right balance of strength and flexibility to accommodate thermal expansion without cracking the surrounding bricks.
View on AmazonStep-by-Step Exterior Repointing Guide
Repointing — the process of removing deteriorated mortar joints and replacing them with fresh mortar — is the most common DIY chimney masonry repair. When done correctly, it restores the weather-tightness and structural integrity of the chimney stack and prevents water from penetrating the joints and causing freeze-thaw damage to the surrounding bricks. Here is the complete process.
Tools You Will Need
- Cold chisel (3/4″ or 1″) and club hammer — for manual joint removal
- Angle grinder with a mortar-raking blade (for large areas — safer and faster than manual chiseling)
- Wire brush — for clearing debris from the raked joints
- Pointing trowel (1/4″ to 3/8″ width depending on joint size)
- Hawk (small mortar board) for holding working mortar
- Spray bottle filled with water
- Bucket and mixing paddle or drill attachment
- Stiff-bristle brush for finishing and cleanup
- Safety glasses and dust mask (N95 minimum) — mortar dust contains silica
- Work gloves — mortar is highly alkaline and will burn bare skin
- Knee pads if working near the chimney base on the roof
-
Assess and Document the Repair Area Before removing any mortar, take photographs and note the depth of joint deterioration. This helps you track your work and confirms later that all affected joints have been addressed. Mark joints that need repair with chalk if the chimney is accessible.
-
Remove Old Mortar to the Correct Depth Using a cold chisel and club hammer — or an angle grinder with a mortar-raking blade — remove deteriorated mortar to a minimum depth of 3/4 inch (approximately 19mm). This depth is critical: shallower patches will have insufficient bonding surface and will pop out quickly, often within a single winter freeze-thaw cycle. Work carefully along the mortar joint, not across it — lateral chisel strokes can crack the brick face.
-
Clear All Debris from the Joints Use a wire brush to thoroughly clean all loose mortar dust, debris, and powdery residue from the raked joints. This step is critical — fresh mortar applied over dusty or loose substrate will bond poorly and fail prematurely. Use compressed air if available to blow out the joints after brushing.
-
Pre-Wet the Joint Area Using your spray bottle, dampen the brick faces and joint cavity with water. This is an essential step that most DIYers skip: if dry brick absorbs water out of fresh mortar too quickly, the mortar cures too fast, compromising its strength and adhesion. Pre-wetting slows this absorption and gives the mortar time to hydrate fully. The brick should be damp but not dripping — a surface that gleams with moisture is ideal.
-
Mix the Mortar to the Correct Consistency Add water to your Type N mortar mix gradually, mixing to a thick, stiff consistency — often described as peanut butter or firm bread dough. Mortar that is too wet is easy to apply but will slump out of vertical joints, shrink excessively as it dries, and produce a weaker final product. Mix only as much as you can use in 30–45 minutes; mortar that begins to stiffen in the bucket should be discarded, not rewetted.
-
Pack the Mortar in Layers for Deep Joints For joints deeper than 3/4 inch, apply mortar in two layers rather than one. Apply the first layer to fill roughly half the joint depth, press firmly to eliminate air voids, and allow it to become “thumbprint hard” (firm to the touch but leaving a slight impression) before applying the second layer. This layered approach ensures thorough consolidation and prevents the patch from shrinking away from the brick faces as it cures.
-
Tool the Joint Profile to Match the Original Once the mortar has stiffened enough to hold shape without smearing (typically 30–60 minutes after application, depending on temperature and humidity), use the appropriate jointing tool to compress and shape the joint profile. The most common profiles are concave (rounded inward), flush, and raked (slightly recessed). Match the original joint profile to maintain the chimney’s aesthetic and ensure consistent water-shedding performance.
-
Clean Mortar Smears Promptly Mortar smeared onto brick faces during application is far easier to remove while still fresh than after curing. Use a stiff-bristle brush and clean water to wipe brick faces within 30 minutes of application. Cured mortar on brick faces requires acid cleaning — a significantly more involved process that can damage the brick if done incorrectly.
-
Cure the Repair Properly Protect fresh mortar from direct sun, wind, rain, and freezing temperatures for at least 72 hours after application. In hot, dry, or windy conditions, lightly mist the fresh mortar with water once or twice a day for the first three days — this extends the hydration period and produces a stronger final product. Do not allow fresh mortar to freeze before it has cured: frost-damaged mortar is permanently weakened and must be removed and replaced.
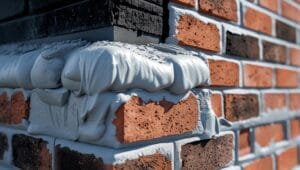
Chimney Crown Repair & Waterproofing
The chimney crown is the concrete cap that covers the top of the chimney stack, surrounding the flue opening(s) and sloping outward to direct water away from the chimney structure. It is one of the most vulnerable points of the entire chimney system, and its deterioration is the leading cause of water damage to chimneys. A cracked or crumbling crown allows water to penetrate directly into the masonry core of the chimney, where freeze-thaw cycling progressively destroys the structure from the inside out.
Types of Crown Damage
- Surface hairline cracking: Very fine surface cracks with no depth penetration. This is the earliest stage of deterioration and the easiest to address. A penetrating crown sealant applied with a brush can infiltrate these cracks and waterproof the surface before they grow.
- Deep or wide cracking: Cracks that penetrate the full depth of the crown, or that are wider than 1/8 inch. These require filling with a flexible, weather-rated repair compound or a crown repair sealant that can bridge gaps rather than just coat surfaces.
- Crumbling or spalling crown: Sections of the crown are delaminating, breaking away, or crumbling at the edges. This indicates that moisture has already been cycling through the material, and the concrete has begun to fail structurally. Spot repairs may extend the crown’s life, but a full crown replacement by a professional mason is the definitive fix.
📌 Crown Construction: Why Most Crowns Fail Prematurely
A properly built chimney crown should be made of solid Portland cement, cast at least 2 inches thick at the edges, and slope away from the flue on all sides at a minimum 5-degree angle. Many builder-grade crowns are constructed from the same mortar used for the chimney’s brickwork — a specification shortcut that produces a crown that will typically begin cracking within 5–10 years. If your crown looks thin, flat, or has the same color and texture as the mortar joints, it was likely built incorrectly and will need periodic maintenance or eventual replacement.
Flue Liner Repair: What You Need to Know
The flue liner is the most safety-critical component of the entire chimney system, and the component most frequently neglected because it is invisible from both the firebox below and the top of the chimney above. Its sole purpose is to contain combustion gases — including carbon monoxide — and direct them safely out of the building while insulating the surrounding masonry from the extreme heat of flue gases.
Types of Flue Liners
- Clay tile liners: The most common type in existing residential chimneys. Rectangular or round clay tiles stacked vertically and jointed with refractory mortar. When intact, they perform well for wood and gas appliances. Their primary weakness is susceptibility to cracking from thermal shock — a chimney fire, in particular, can crack tiles throughout the entire flue height in a single event.
- Stainless steel liners: The standard for new chimney installations and for relining deteriorated clay tile chimneys. Available as rigid sections or flexible corrugated tubes (for chimneys with offsets or bends). Stainless steel liners require no mortar — they are mechanically connected — but their installation is a professional job involving sizing, insertion, and proper termination.
- Cast-in-place liners: A system where a specialized refractory slurry is poured or pumped around an inflatable form inside the existing chimney, creating a custom-fitted liner that conforms exactly to the flue’s shape. Ideal for old, irregular, or deteriorated chimneys with out-of-round or offset sections. Always professionally installed.
✅ When Can You DIY a Liner Joint?
The only liner repair appropriate for a DIY approach is repointing the individual joints between clay tile sections at the point where the liner meets the smoke chamber (visible from inside the firebox when looking up). This specific repair uses refractory mortar applied carefully to a joint that has opened due to settlement or thermal cycling. Any other liner repair — including cracked tiles, misaligned sections, or bypassed joints deeper in the flue — requires professional camera inspection and remediation.
Historic Chimney Mortar: The Old House Special Case
If your home was built before approximately 1930, the original chimney mortar is almost certainly a softer, lime-based formula that bears little resemblance to modern Portland cement mortars. This is not a deficiency — it is an intentional design characteristic of the masonry tradition of that era, and matching it correctly is one of the most important and most frequently botched aspects of historic chimney repair.
Pre-Portland cement masonry used natural hydraulic lime or lime putty mortars with compressive strengths as low as 75–350 psi — far weaker than any modern bagged mortar mix you will find at a hardware store. These soft mortars were specifically designed to be the sacrificial element of the masonry assembly: under stress, they crack before the brick does. This keeps the irreplaceable, hand-made or historic bricks intact and reduces the repair to the easily replaced mortar joint rather than the brick itself.
The Danger of Modern Mortar on Historic Brick
Repointing a pre-1930 chimney with standard Type N mortar — let alone Type S or M — introduces a mortar that is three to twenty times harder than the original. When the assembly undergoes thermal cycling or slight structural movement, the modern mortar patch holds rigidly while the surrounding historic brick is forced to absorb the stress. The result is spalling brick faces, cracked brick bodies, and an expensive repair that far exceeds the original cost of a specialist lime mortar job. This pattern is so predictable and so well-documented that most historic preservation organizations consider inappropriate repointing the single leading cause of unnecessary brick replacement in historic buildings.
If you own a pre-1930 home and are unsure of your original mortar composition, do not guess. Take a small sample of original mortar from a deteriorated joint to a masonry specialist or historic preservation contractor for analysis before purchasing any materials. The extra cost of this step is a fraction of the cost of replacing brick damaged by incompatible mortar.
Mixing and Consistency Guide
Even with a pre-blended bagged mix, the amount of water you add and the thoroughness of your mixing are critical variables that determine the final strength and workability of the mortar. Here is a practical reference for getting the consistency right every time.
| Consistency | Appearance | Use | Problem |
|---|---|---|---|
| Too wet | Slumps and flows; shiny surface | Do not use | Slumps from joints; excessive shrinkage; weak bond |
| Correct: Stiff | Holds shape when sliced; dull surface; stays on trowel when inverted | All pointing and bedding work | None — this is the target |
| Too dry | Crumbles; won’t pack into joint; no cohesion | Do not use | Poor adhesion; voids; premature crumbling |
| Stiffened in bucket | Begins to resist trowel; loses tackiness | Discard — do not retemper | Adding water to stiffened mortar permanently weakens it |
Curing Times, Weather Windows & Common Mistakes
Optimal Weather Conditions for Mortar Work
- Temperature: Work only when the air temperature is between 40°F (5°C) and 90°F (32°C) and will remain above 40°F for at least 48 hours after application. Mortar that freezes before achieving initial set is permanently damaged and must be removed.
- Humidity: Moderate humidity (40–70%) is ideal. Extremely low humidity (dry, windy days) accelerates drying and can prevent full hydration — mist the work frequently. Extremely high humidity slows curing and increases the risk of efflorescence.
- Direct sunlight: Avoid direct sun exposure on fresh mortar — it accelerates surface drying and can cause surface crazing (fine surface cracks). Work in shade where possible, or shade fresh work with a damp burlap cloth.
- Rain: Do not apply mortar if rain is forecast within 24 hours of application. Rain on fresh mortar washes out the cement before it bonds, producing a permanently weakened joint.
Most Common DIY Repointing Mistakes
- Insufficient joint depth: Not removing enough old mortar. The minimum is 3/4 inch — shallow patches always fail.
- Skipping pre-wetting: Dry brick pulls water out of mortar, causing premature and incomplete hydration and a weak bond.
- Wrong mortar type: Using concrete mix, general-purpose mortar, or any “multi-purpose” compound not specifically formulated for masonry repointing.
- Retemping stiffened mortar: Adding water to mortar that has begun to stiffen in the bucket. This disrupts the cement hydration process and permanently reduces the mortar’s final strength.
- Poor joint tooling: Failing to compress the fresh mortar into the joint with a jointing tool — tooling consolidates the mortar, closes surface voids, and creates a harder, more weather-resistant face.
- Working in direct frost: Any temperature below 40°F risks ice crystal formation in the fresh mortar, which destroys its internal microstructure before it has cured.
Frequently Asked Questions
Can I use regular concrete patch on my chimney?
Absolutely not. Concrete has a very different thermal expansion coefficient from brick and is extremely rigid. When heated and cooled, it will crack away from the brick surfaces rapidly. Its high density also traps moisture within the joint, which accelerates freeze-thaw spalling of the surrounding bricks. Concrete patch products are for horizontal concrete flatwork — they have no place in chimney masonry repair.
What’s the difference between repointing and tuckpointing?
While used interchangeably in casual conversation, they are technically distinct techniques. Repointing is the functional repair process: removing deteriorated mortar and replacing it with fresh mortar to restore structural integrity and weather-tightness. Tuckpointing is a decorative masonry technique where two contrasting mortar colors are used — a base mortar that closely matches the brick color, filled to the full joint width, and then a narrow ribbon of contrasting (usually white or cream) mortar applied in the center to create the visual illusion of very fine, precise joints. Tuckpointing is purely aesthetic and does not provide any additional structural or weatherproofing benefit over standard repointing.
How deep do I need to remove old mortar before repointing?
A minimum of 3/4 inch (19mm) of depth is required for adequate bonding surface. Many professional masons aim for a full inch (25mm) to maximize the mechanical key between fresh mortar and the brick faces. Joints raked to less than 1/2 inch depth will almost invariably fail within one to two freeze-thaw seasons, as the thin patch lacks sufficient bond area and mass to resist the forces acting on it. Use a plugging chisel and club hammer for manual removal, or an angle grinder fitted with a mortar-raking diamond blade for faster, more consistent results on larger areas.
How long does chimney mortar last?
Quality exterior chimney mortar, properly installed, has an expected lifespan of 20–30 years under typical residential conditions. Factors that shorten mortar life include persistent moisture infiltration (from a damaged crown, missing chimney cap, or failed flashing), extreme temperature cycling in harsh climates, use of a mortar that is too hard for the existing bricks, and use of low-quality pre-mixed products. Refractory mortar inside the firebox tends to have a shorter effective lifespan — 10–15 years in a frequently used fireplace — due to the extreme thermal cycling it endures.
Do I need to seal the chimney after repointing?
Yes, a penetrating masonry water repellent applied to the exterior chimney surface after repointing is strongly recommended. Masonry is inherently porous, and even intact mortar joints allow a degree of water absorption during sustained rain. A quality penetrating siloxane or silicone-based sealant bonds to the masonry substrate at the molecular level, blocking water absorption while still allowing water vapor to escape outward (critically — it does not trap moisture inside the masonry the way film-forming sealants do). Apply after mortar has fully cured, typically 28 days after a fresh repointing job. Never apply sealant over fresh, uncured mortar.
My bricks look white and powdery. Is that a mortar problem?
The white powdery deposit you are seeing is called efflorescence — mineral salts (primarily calcium sulfate and potassium carbonate) that have been dissolved by water percolating through the masonry and deposited on the surface as the water evaporates. Efflorescence is a symptom, not a cause: it tells you that water is moving through your chimney’s masonry. The source of that water may be a deteriorated crown, damaged flashing, a missing chimney cap, or failed mortar joints. Simply brushing off the efflorescence will not solve the problem — the water pathway driving it must be identified and eliminated, or the deposit will recur. Address the water source first, then clean the efflorescence with a dilute muriatic acid solution applied carefully to dry brick.
Can I repoint in cold weather?
Fresh mortar must not be allowed to freeze before achieving its initial set — typically the first 24–48 hours after application are the most critical. As a firm guideline, do not repoint if the temperature has been or will be below 40°F (5°C) within 48 hours of your work window. If you must work in marginal temperatures, protect fresh mortar with breathable insulating fabric overnight, and do not use accelerating additives (antifreeze compounds) in exterior masonry mortar — they disrupt the cement chemistry and produce weaker, more porous results.
How do I know if my chimney needs repointing or full rebuilding?
Repointing is appropriate when the bricks themselves are structurally sound and the damage is confined to the mortar joints. If you can wiggle individual bricks by hand, if large sections of mortar are missing to the full joint depth, or if the chimney has any visible lean or structural movement, repointing alone is insufficient — the chimney needs partial or full rebuilding by a licensed mason. As a rough field test: press your thumb firmly into the existing mortar. If it crumbles or powders under moderate pressure, the mortar has lost its structural integrity and repointing is warranted. If the mortar is hard and resistant but simply recessed below the brick face, a thorough repointing job should be effective.